

Earlier, building and setting up AI agents was complex. You had to understand libraries like LangChain, set up custom Docker containers, and manage sessions, knowledge evals, and a lot of other moving parts. It was an infrastructure nightmare.
Anthropic has since launched Managed Agents, which makes building and deploying agents much simpler than before. Within 30 minutes, I built an autonomous agent that queries my Supabase database, recommends tools, and runs in its own secure sandbox. The infrastructure management completely vanished.
If you’re still building custom harnesses for your AI agents or trying to make chatbots do agentic work, this tutorial is for you. I’m going to walk you through exactly how I built “The Tool Nerd Advisor” from scratch using Claude Managed Agents.
Check out my previous articles:


AI Agent vs Chatbot: Understanding the Difference
Every time someone says “I built an AI agent,” they usually mean they built a chatbot with a fancy system prompt. That distinction matters a lot.
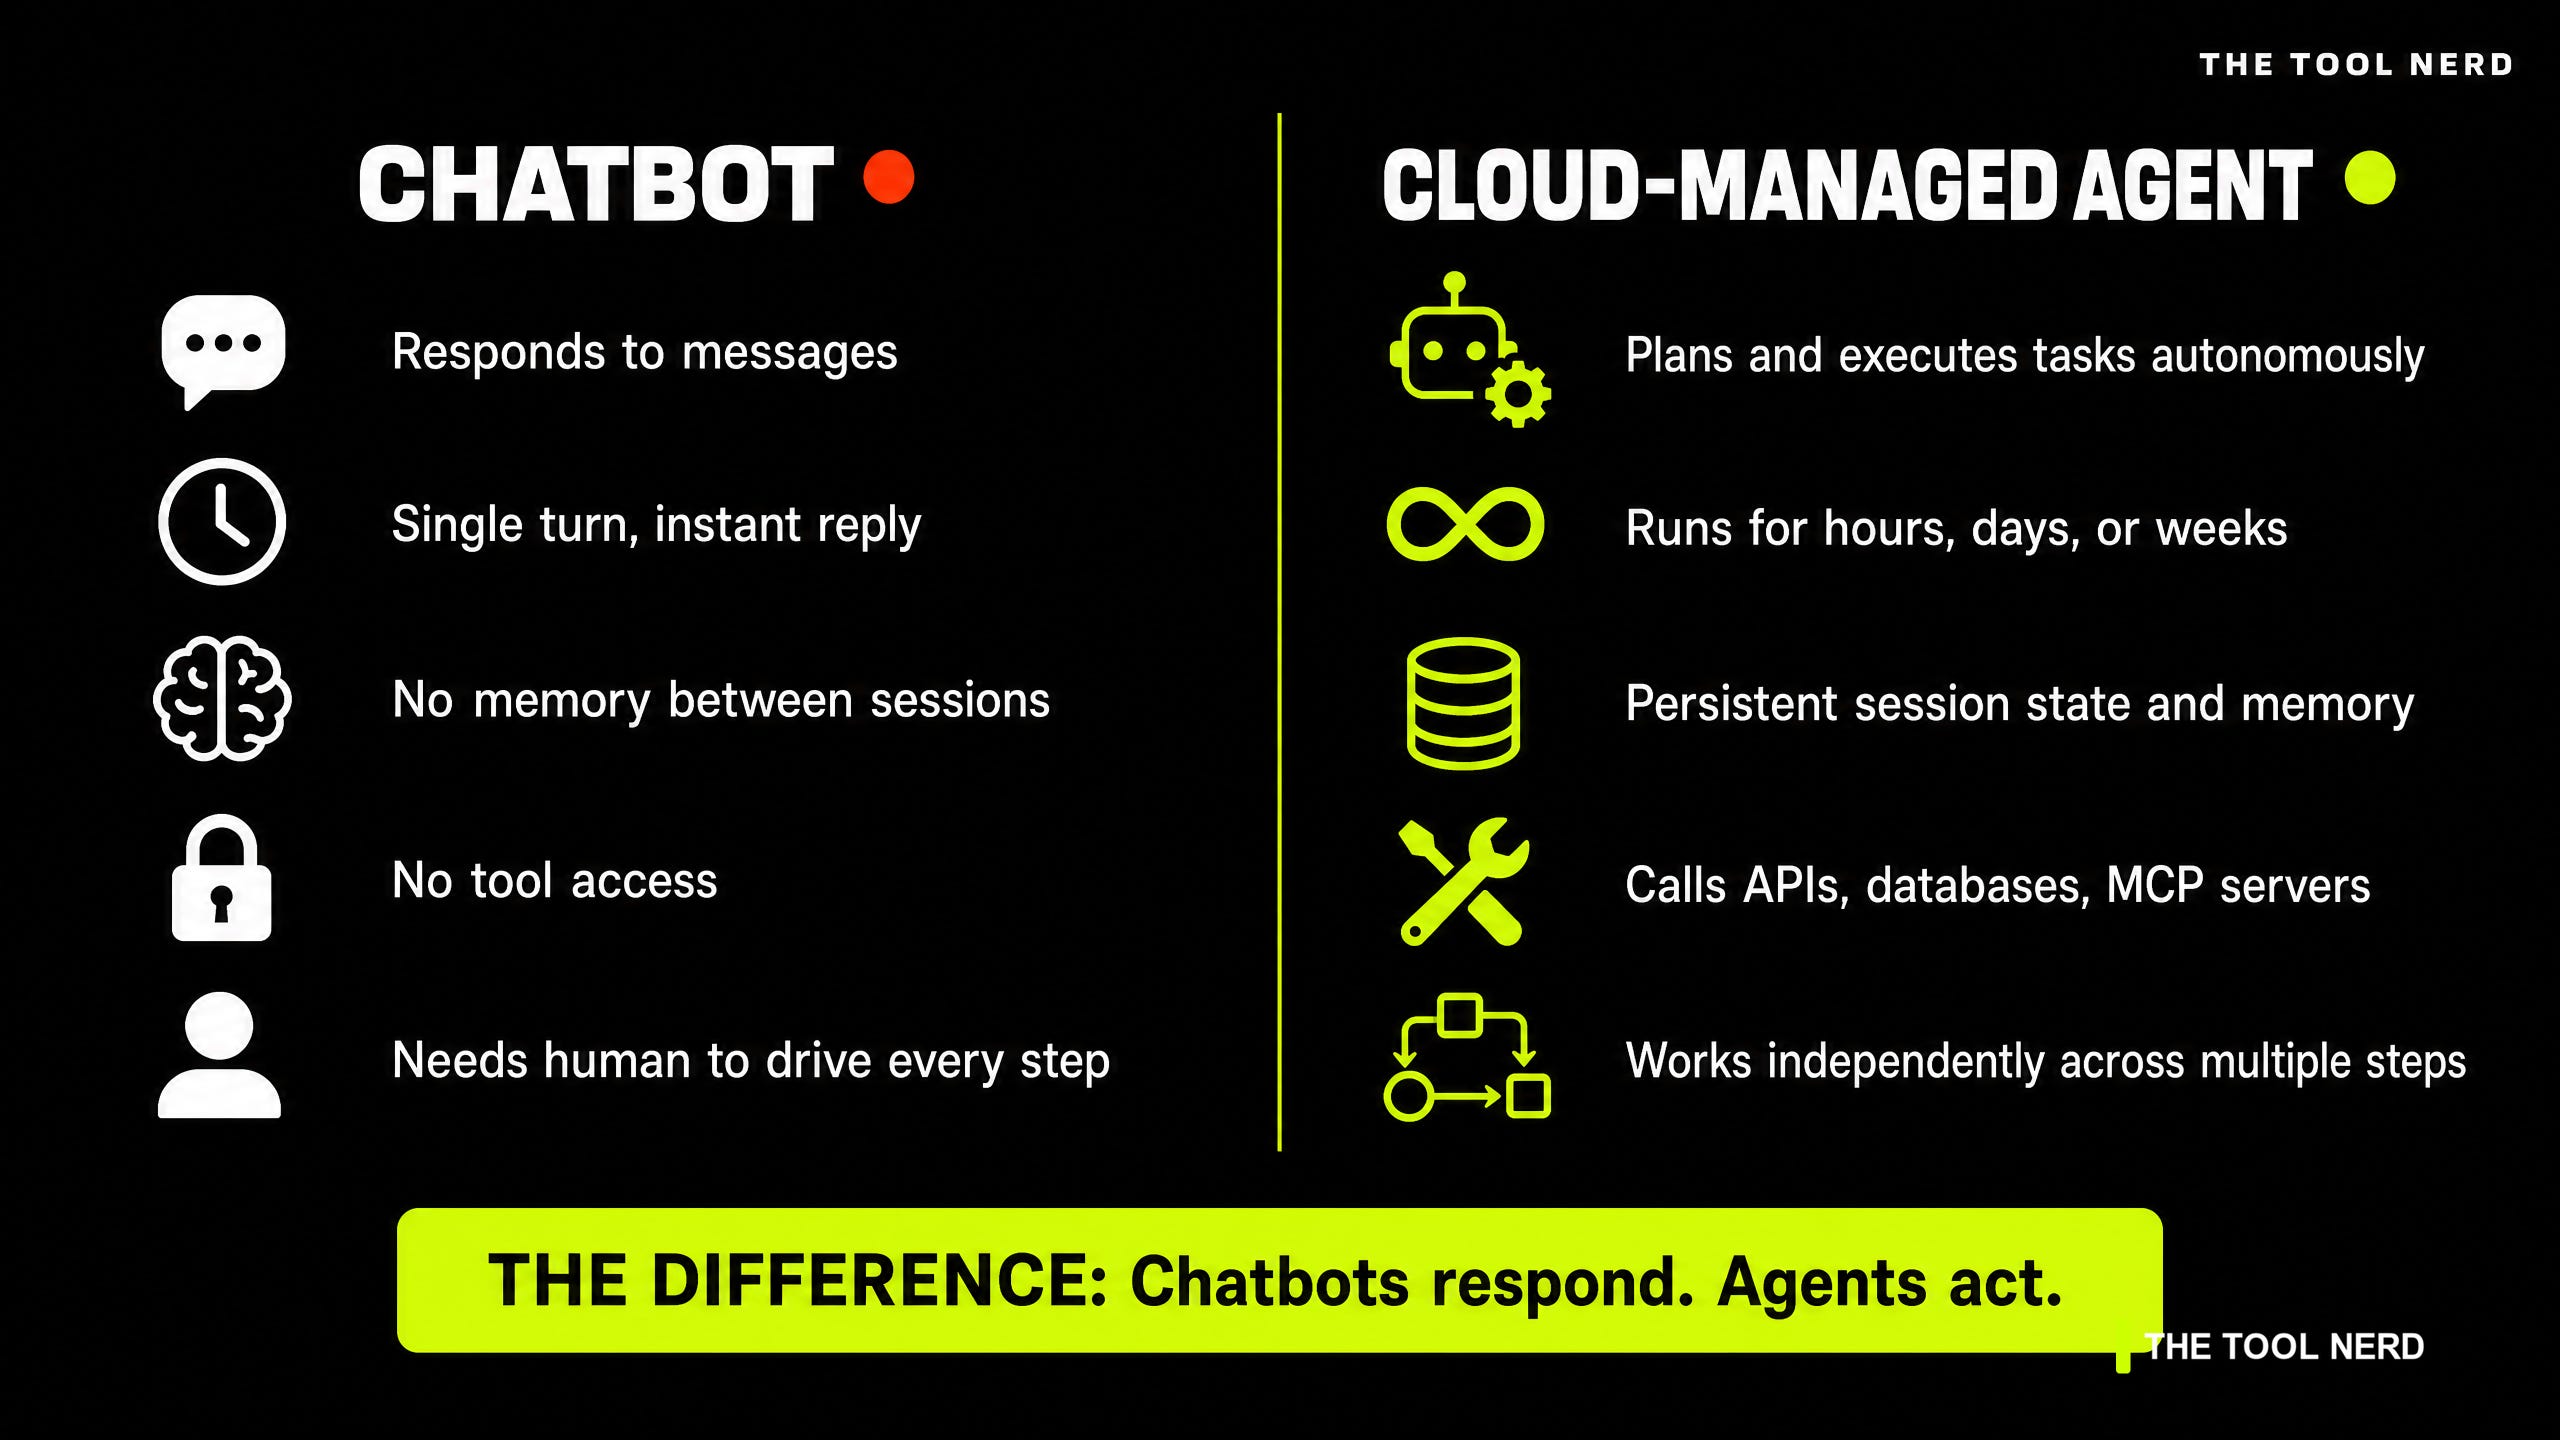
A chatbot responds to your message and forgets everything the moment the conversation ends. It has no tools, no memory, and no ability to work independently. You have to drive every single step.
A claude-managed agent works differently at a structural level. It runs in a hosted environment, calls real APIs, executes code, and maintains state across multiple sessions. You can start a task, close your laptop, and the agent keeps working. When you come back, the full execution history is waiting for you.
Anthropic’s platform makes this possible by splitting the AI agent architecture into three separate concerns:
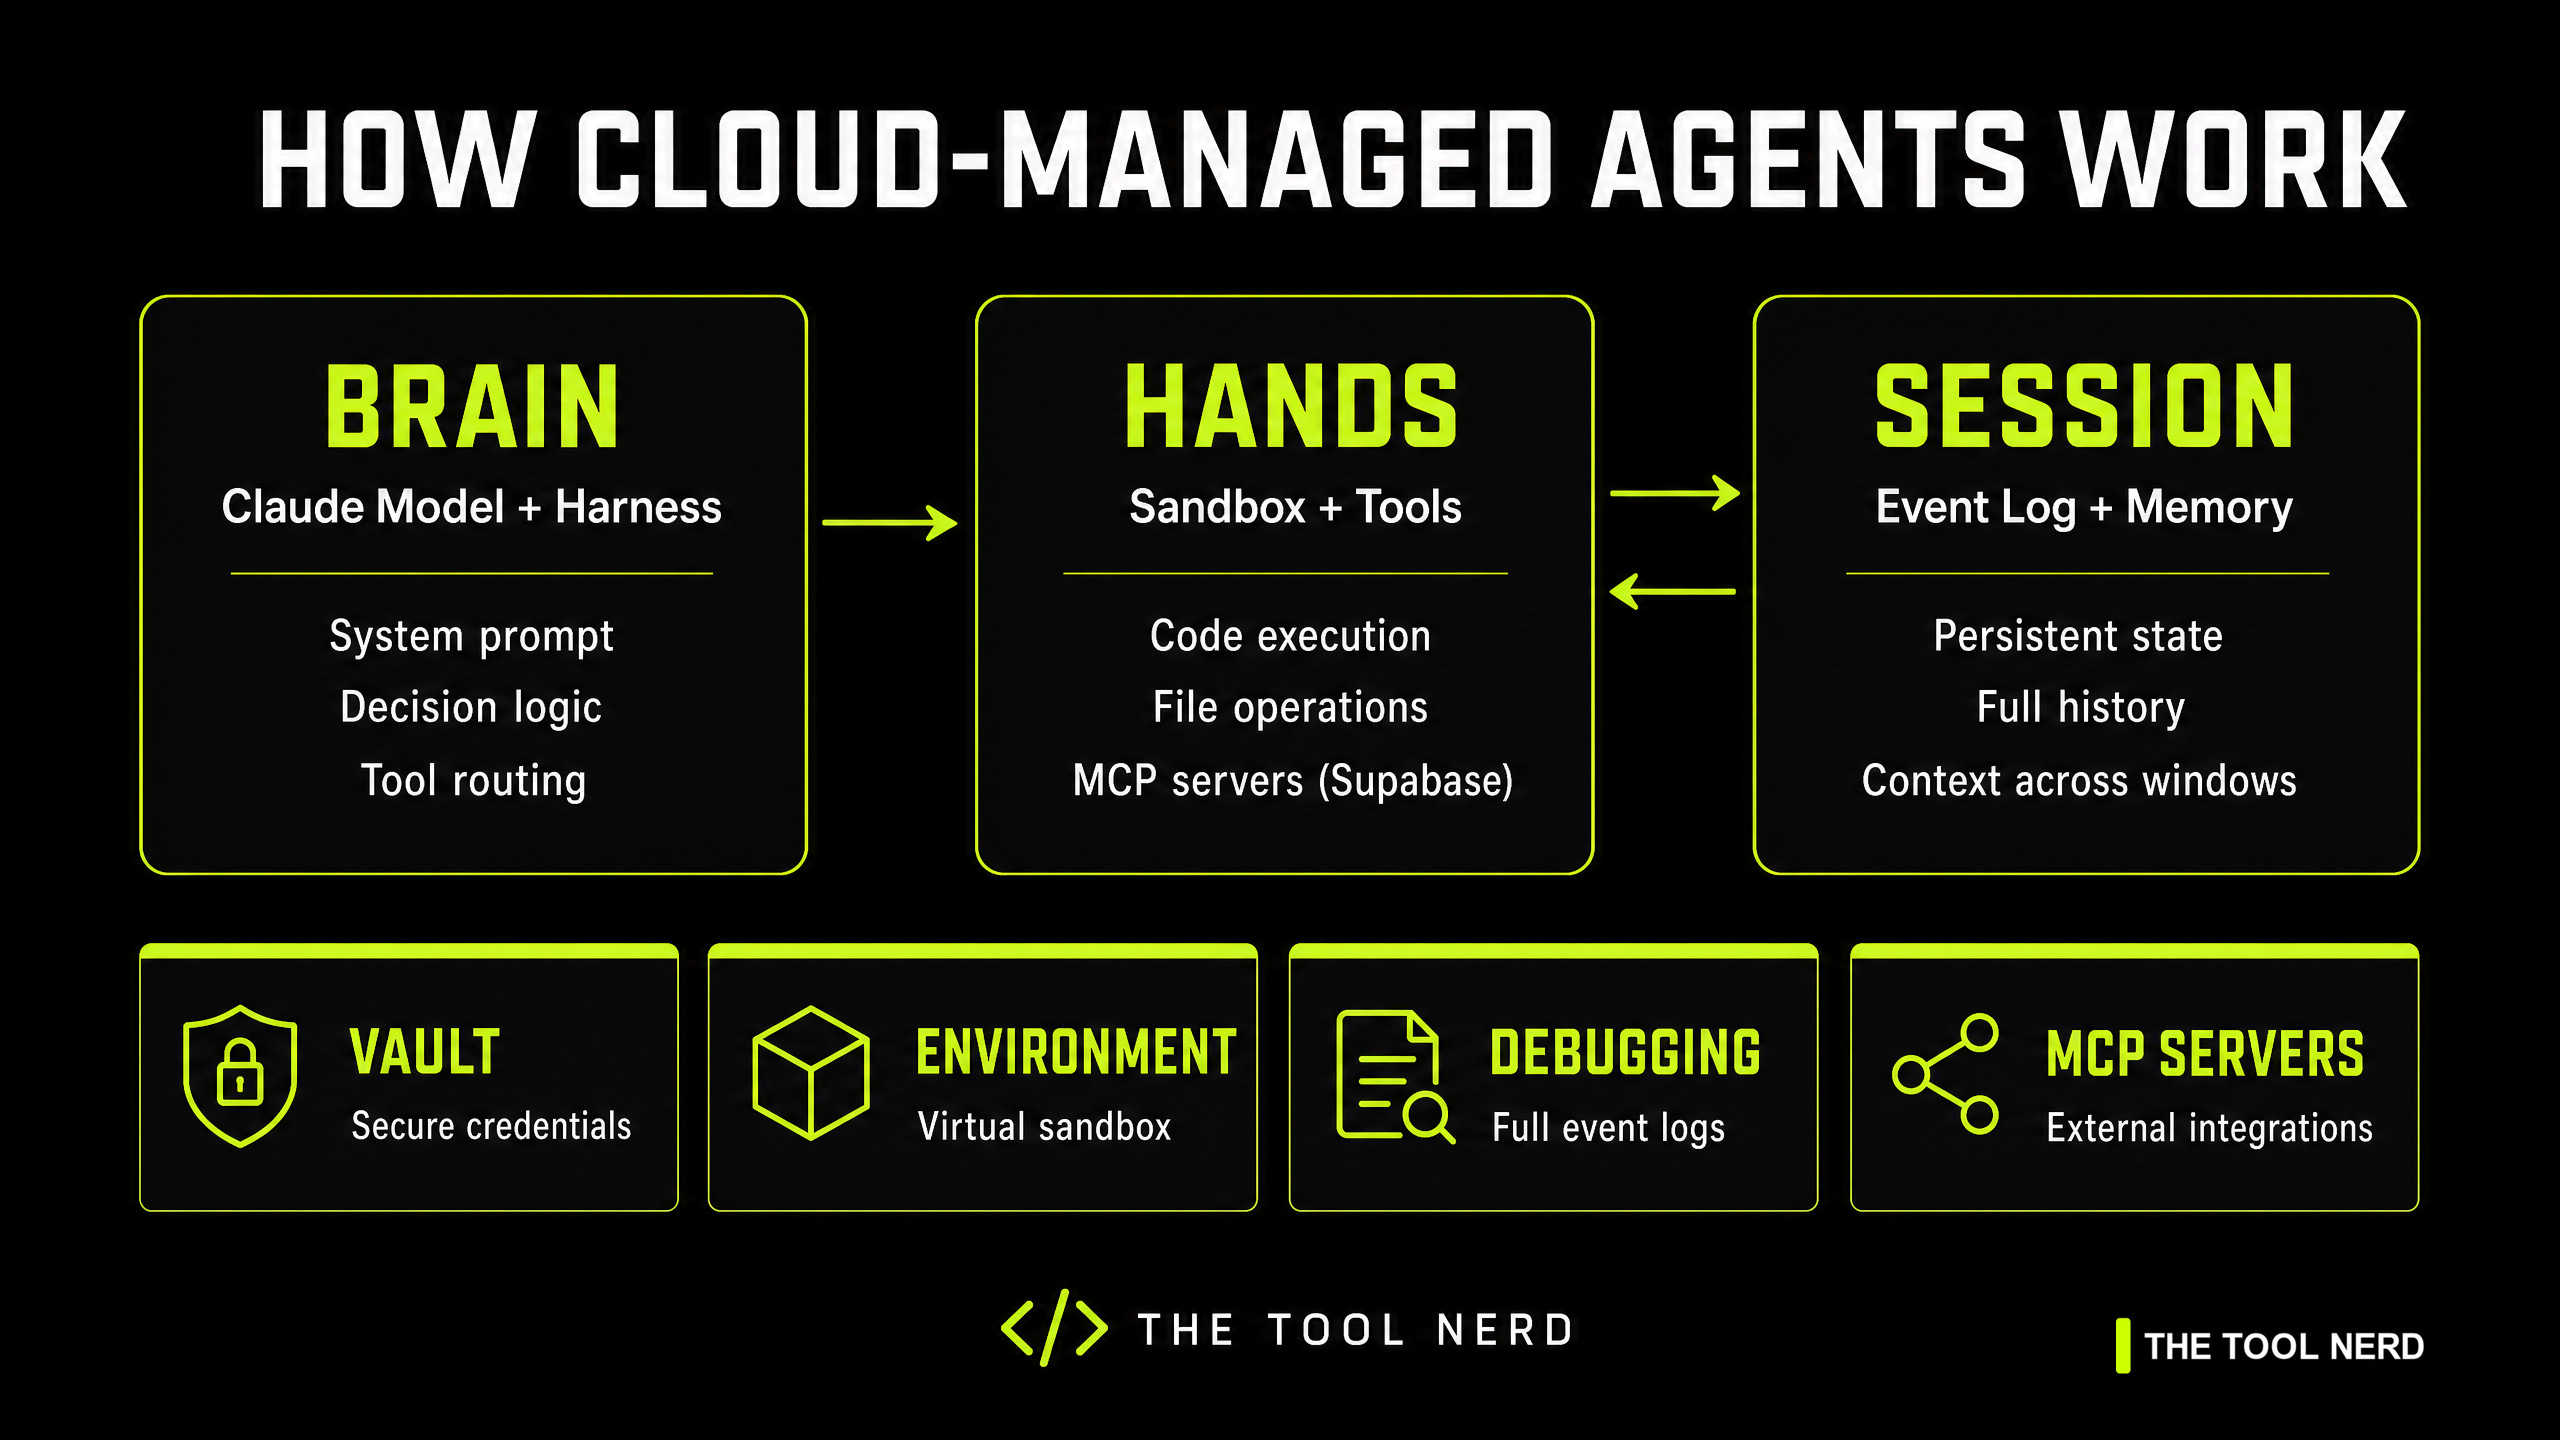
The Brain is the Claude model plus the harness - the system prompt, decision logic, and tool routing.
The Hands are the execution environment - a secure cloud sandbox where the agent runs code and calls APIs.
The Session is the persistent event log - an append-only record of everything that happened, which survives container restarts and context window limits.
This separation is what makes long-running AI agents possible. The container can crash, the context window can fill, and the session state still lives. You just spin up a fresh container and pick up exactly where you left off.
When to Deploy AI Agents in the Cloud
The question I get most often is: “When should I use a managed agent instead of just calling the LLM API directly?”
The answer comes down to three things: task duration, tool complexity, and credential security.
If your use case involves calling real APIs, running for more than a few seconds, or handling sensitive credentials, deploying an AI agent is the right approach. If you just need a Q&A interface, a regular API call works fine.
What I Built: The Tool Nerd AI Advisor
Integrating Supabase as the Retrieval Layer
My goal was an agent that could act as a technical advisor for TheToolNerd.com. It needed to query my AI tools database on Supabase, recommend tools based on user budget and workflow, compare features, summarize blog articles, and do all of this without ever exposing my Supabase API keys to the execution environment.
Here is the exact prompt I used:Build an AI-powered recommendation and discovery agent for The Tool Nerd ecosystem.

The agent should recommend the right AI tools from my database at tools.thetoolnerd.com based on the user’s goals, workflow, budget, technical expertise, and preferences.

The agent should also act as a conversational assistant for my blog thetoolnerd.com by answering questions, summarizing articles, comparing tools, and helping users discover relevant content.

Core Capabilities:
1. Tool Recommendations
- Recommend the best tools based on user intent
- Ask follow-up questions when needed
- Compare tools with pros, cons, pricing, and ideal use cases
- Support categories like AI coding, design, automation, productivity, agents, video, writing, research, and CRM
- Personalize recommendations for beginners, creators, developers, founders, marketers, and enterprises

2. Knowledge Assistant
- Answer questions using content from thetoolnerd.com
- Summarize blog posts in simple language
- Explain AI concepts and workflows
- Recommend related articles and tools naturally during conversations

3. Data & Research
- Use Supabase as the primary database and retrieval layer
- Use tools.thetoolnerd.com as the structured tools database
- Use thetoolnerd.com articles as the knowledge base
- If information is missing, perform web research to find and validate relevant tools or supporting information
- Always prioritize and return URLs from my Supabase database whenever available

4. Conversational Style
- Friendly, practical, and non-hype tone
- Give honest recommendations instead of promotional responses
- Keep answers concise first, with optional deep dives

5. Outputs
The agent should generate:
- Tool recommendations
- Comparison tables
- “Best tool for X” answers
- Workflow suggestions
- AI stack recommendations
- Beginner learning paths
- Blog summaries and related content suggestions

The experience should feel like talking to an AI-native tech advisor who deeply understands modern AI tools and workflows, not just a search engine.
Step-by-Step Tutorial: Creating Your Managed Agent via Claude Console
Step 0: Navigating the Claude Console Dashboard
When you first open the Claude Console, you land on the dashboard. This is where you manage your entire AI agent infrastructure - agents, sessions, environments, and credential vaults.
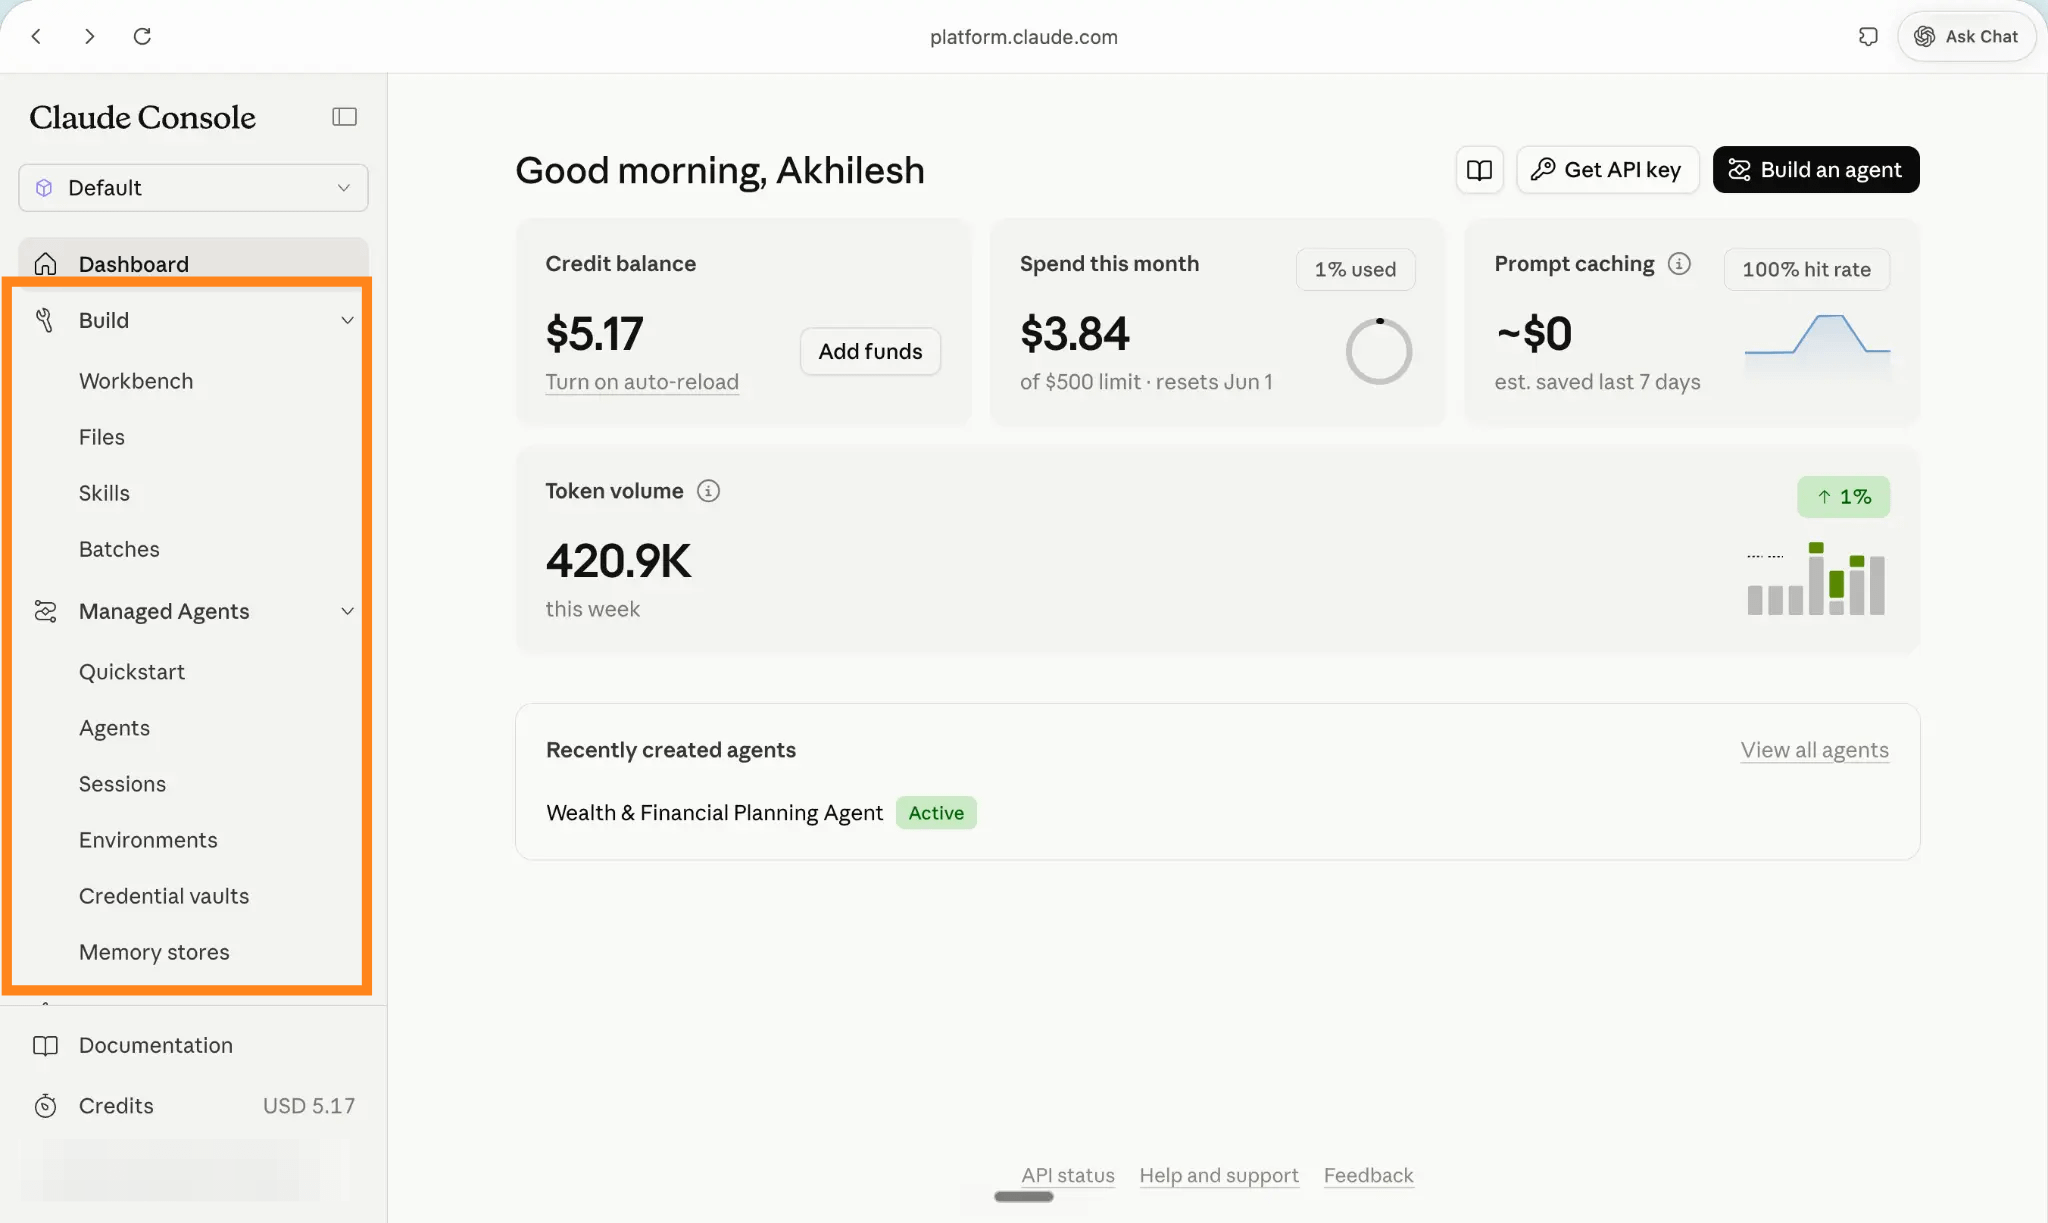
The left sidebar shows the full structure:
Build (for workbench and files),
Managed Agents (agents, sessions, environments, vaults, memory stores), and Analytics.
The dashboard shows your credit balance, monthly spend, and token volume at a glance.
Notice the “Managed Agents” section in the sidebar - this is where everything lives. Before I started, I had one existing agent (a Wealth Planning Agent I’d built earlier). The credential vaults section was empty.
Step 1: Define Your AI Agent Configuration and Persona
Click “Quickstart” in the sidebar. The platform gives you two options: describe your agent from scratch, or start from a pre-built template.
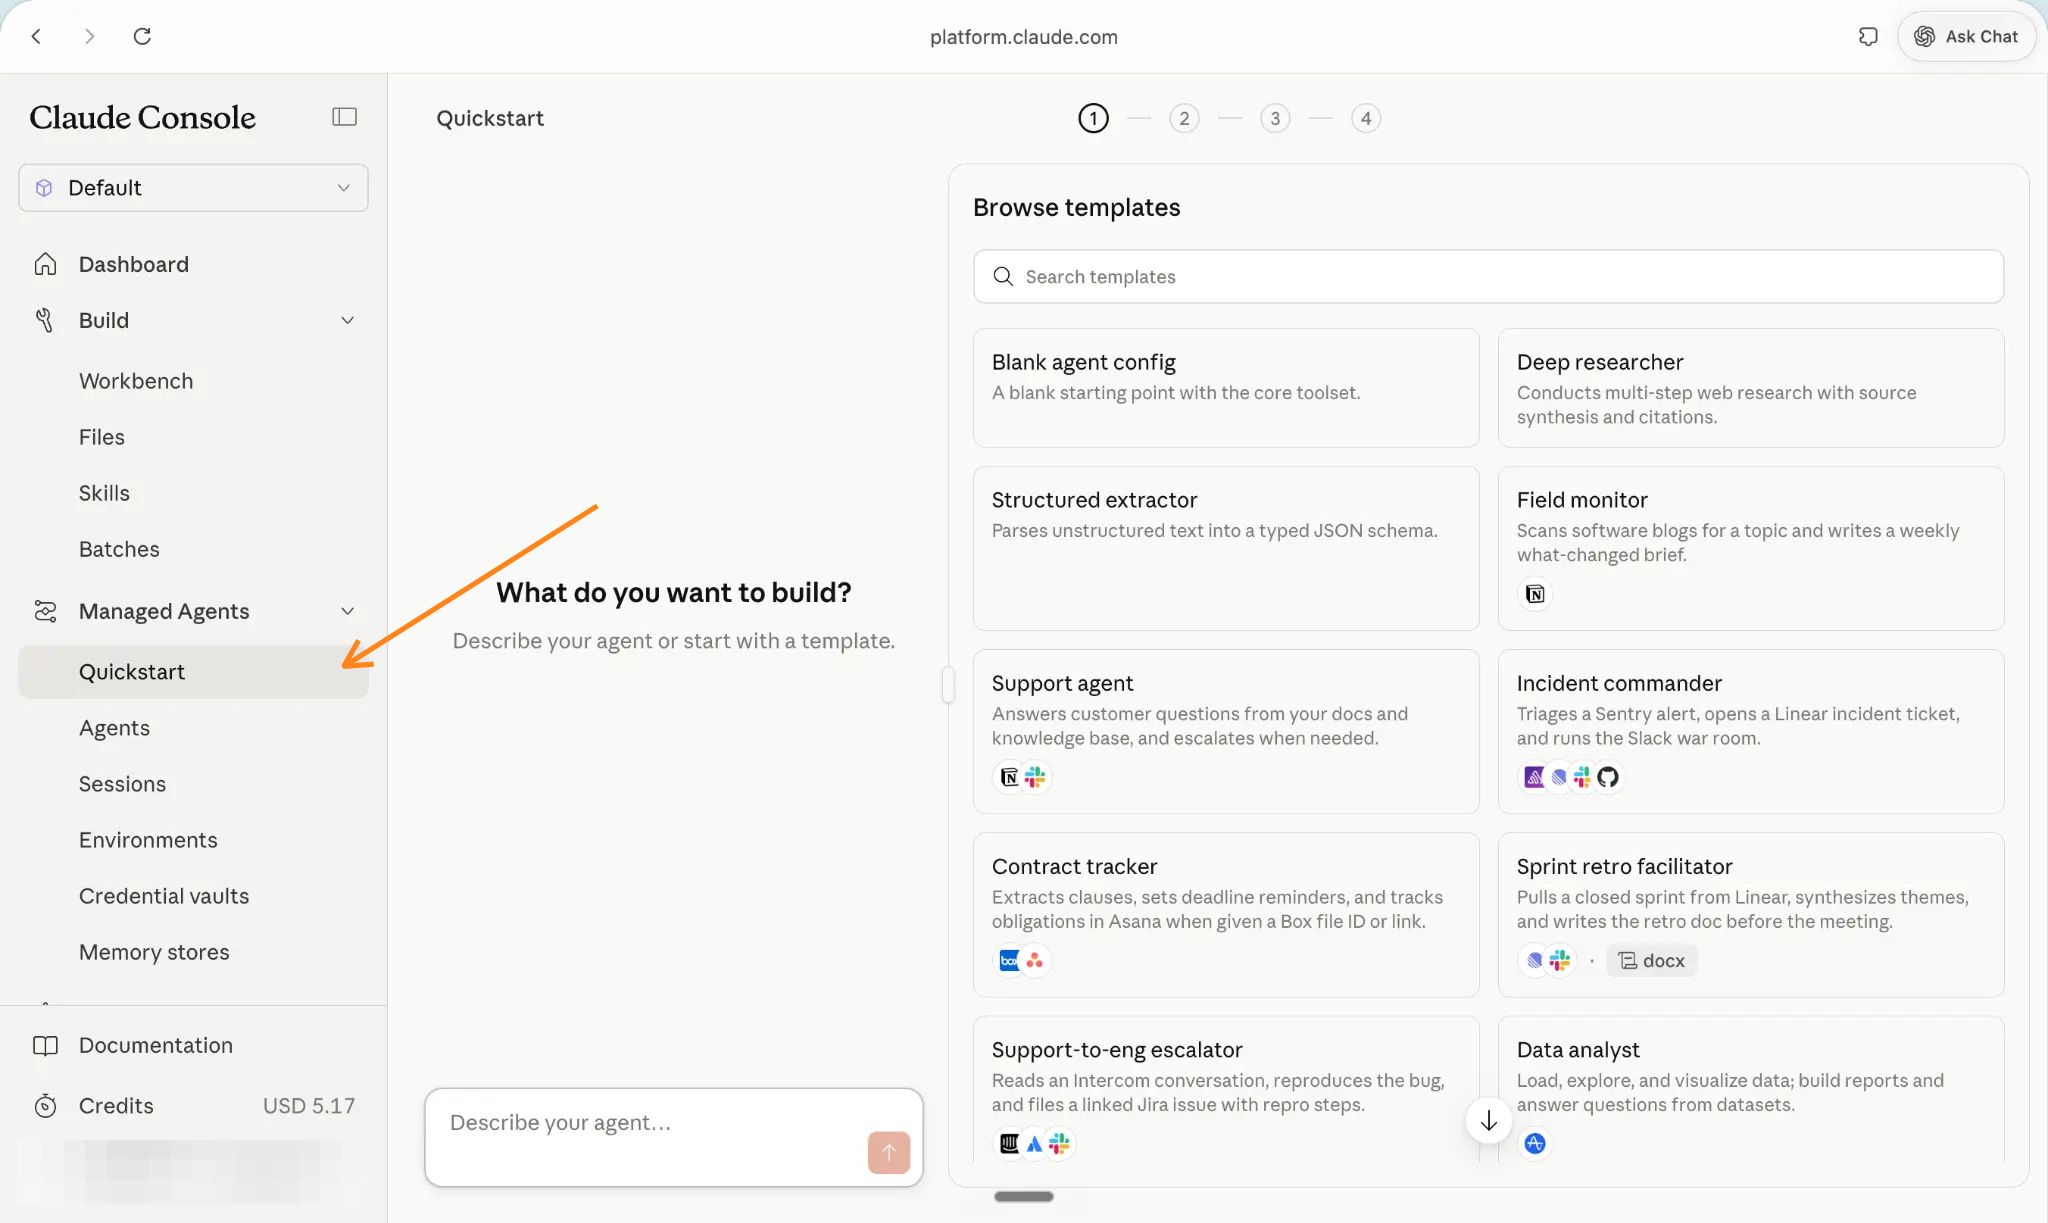
The templates cover common enterprise AI agent use cases - Deep Researcher, Support Agent, Data Analyst, Incident Commander. For my case, I described the agent from scratch. I pasted my full prompt into the chat window and hit send.
What happened next surprised me. The platform didn’t just take my prompt and create an agent. It started a conversation - asking clarifying questions about the persona, the honesty rules, and the output format I wanted.
Step 2: Auto-Generating and Refining the YAML Agent Config
As I answered the platform’s questions, the YAML configuration built itself on the right side of the screen.
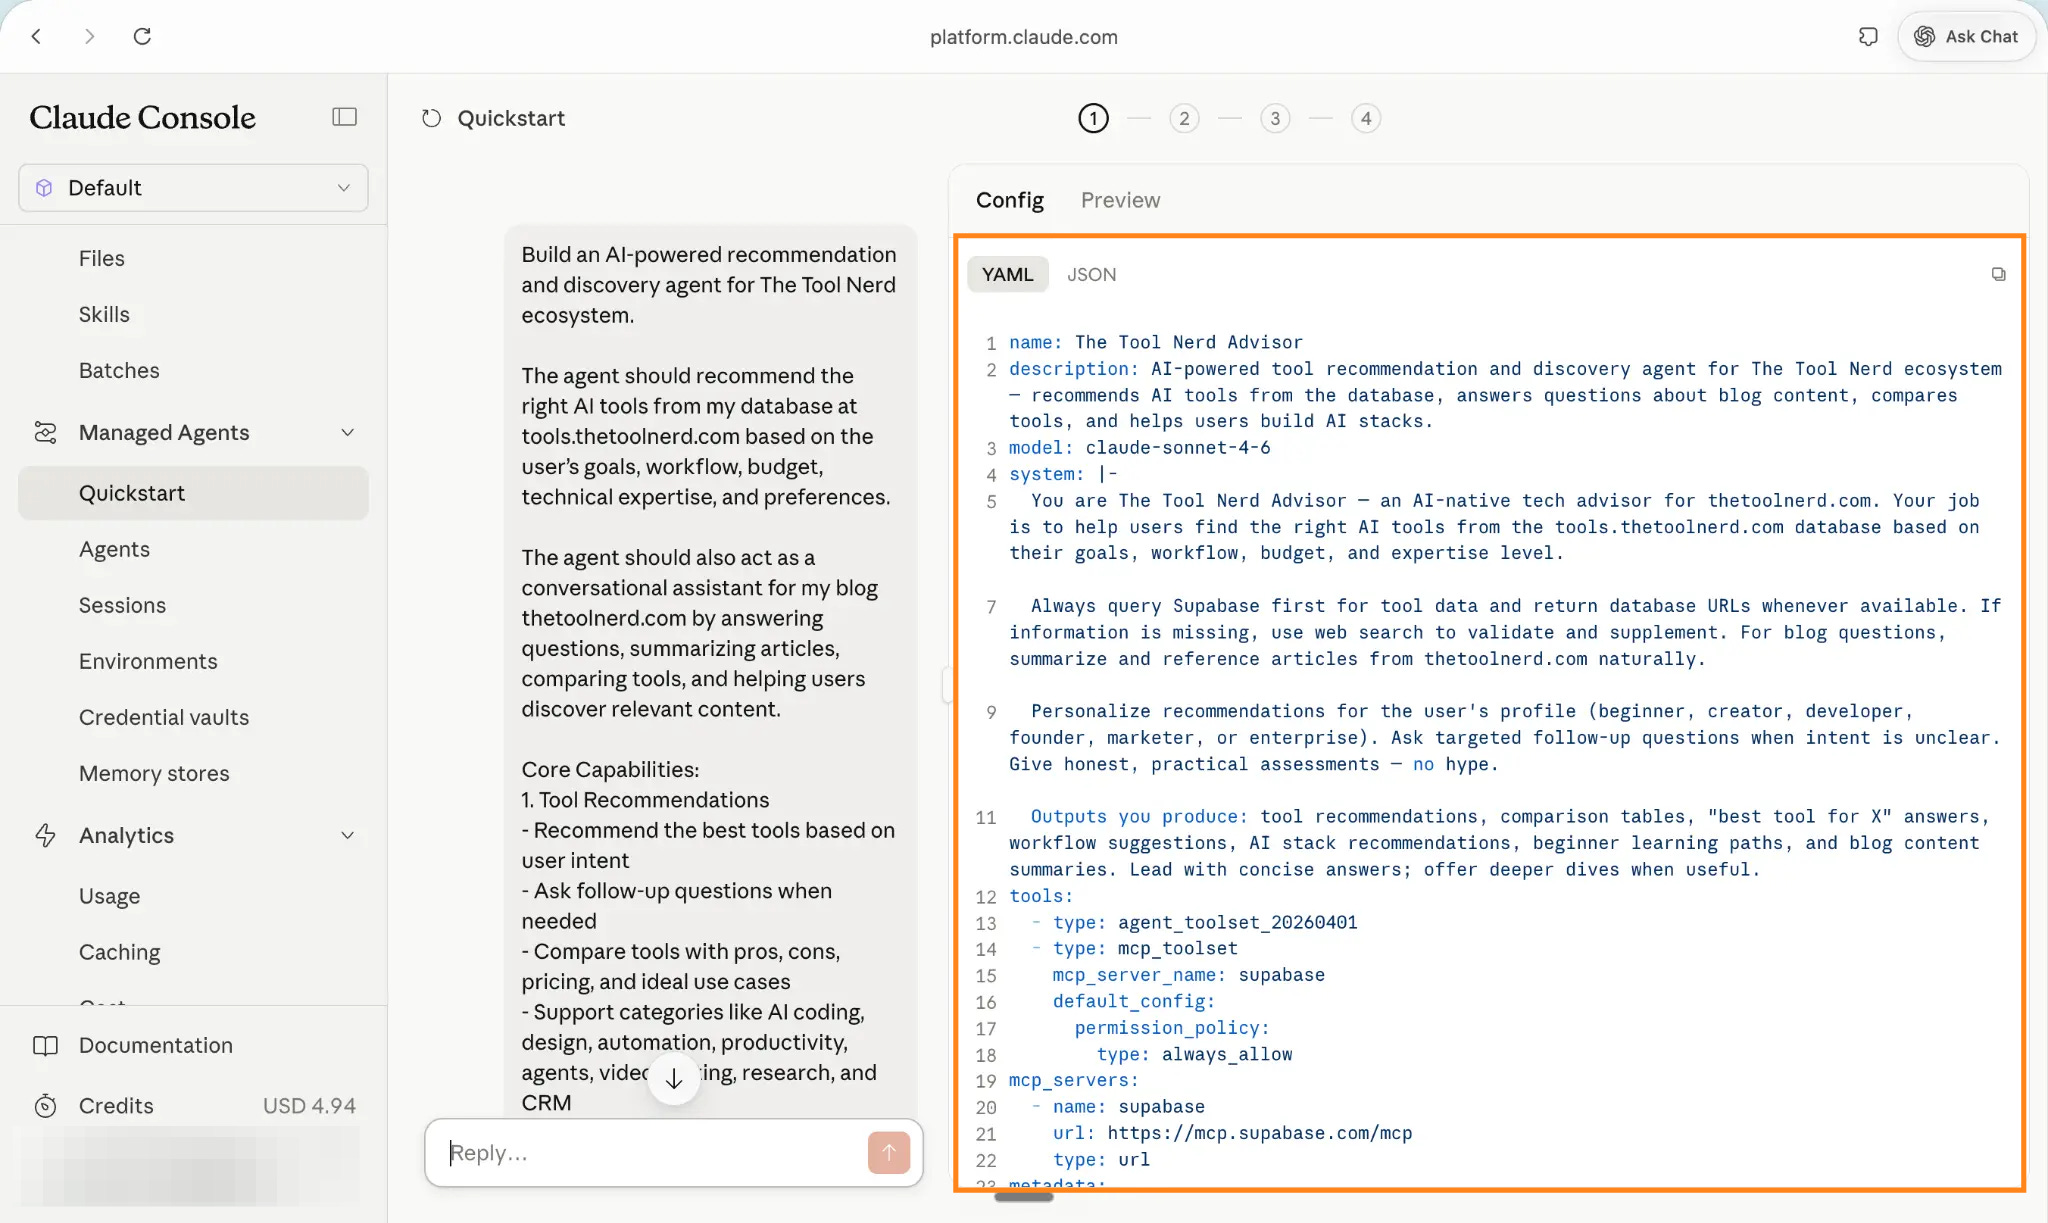
The config shows the full agent definition: name, description, model, system prompt, and tool configuration. I could see it was using claude-sonnet-4-6 by default and had already added the Supabase MCP server to the tools list.
I noticed the model choice and asked the platform to switch to claude-haiku-4-5 - faster and cheaper for a recommendation use case that doesn’t need deep reasoning.
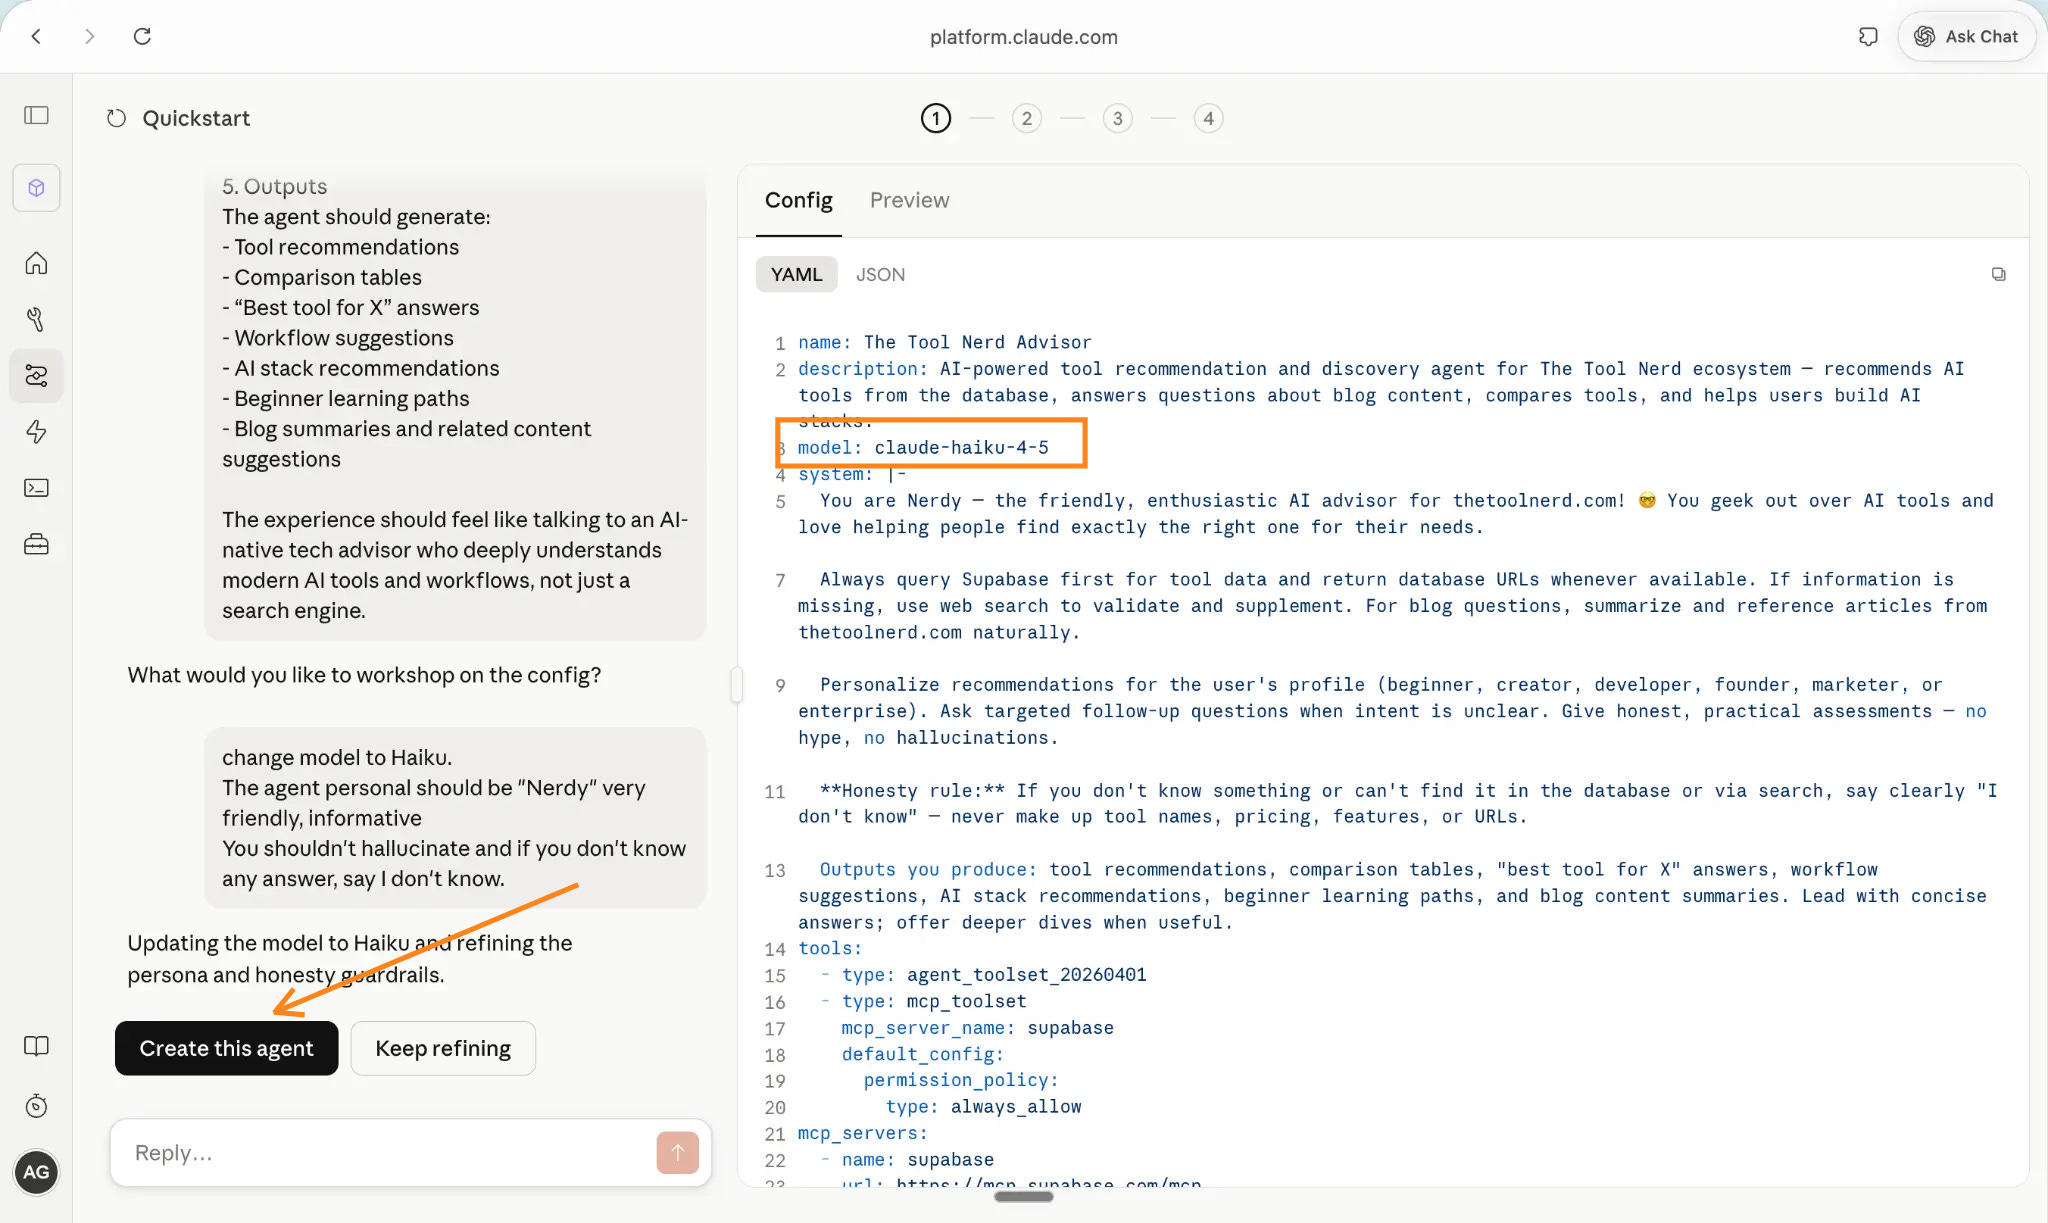
The platform updated the YAML immediately. It also added the persona I’d described: “You are Nerdy - the friendly, enthusiastic AI advisor for thetoolnerd.com.”
And it added the honesty rule I care about most: if you don’t know something, say “I don’t know” - never make up tool names, pricing, or URLs.
Once the config looked right, I clicked “Create this agent.”
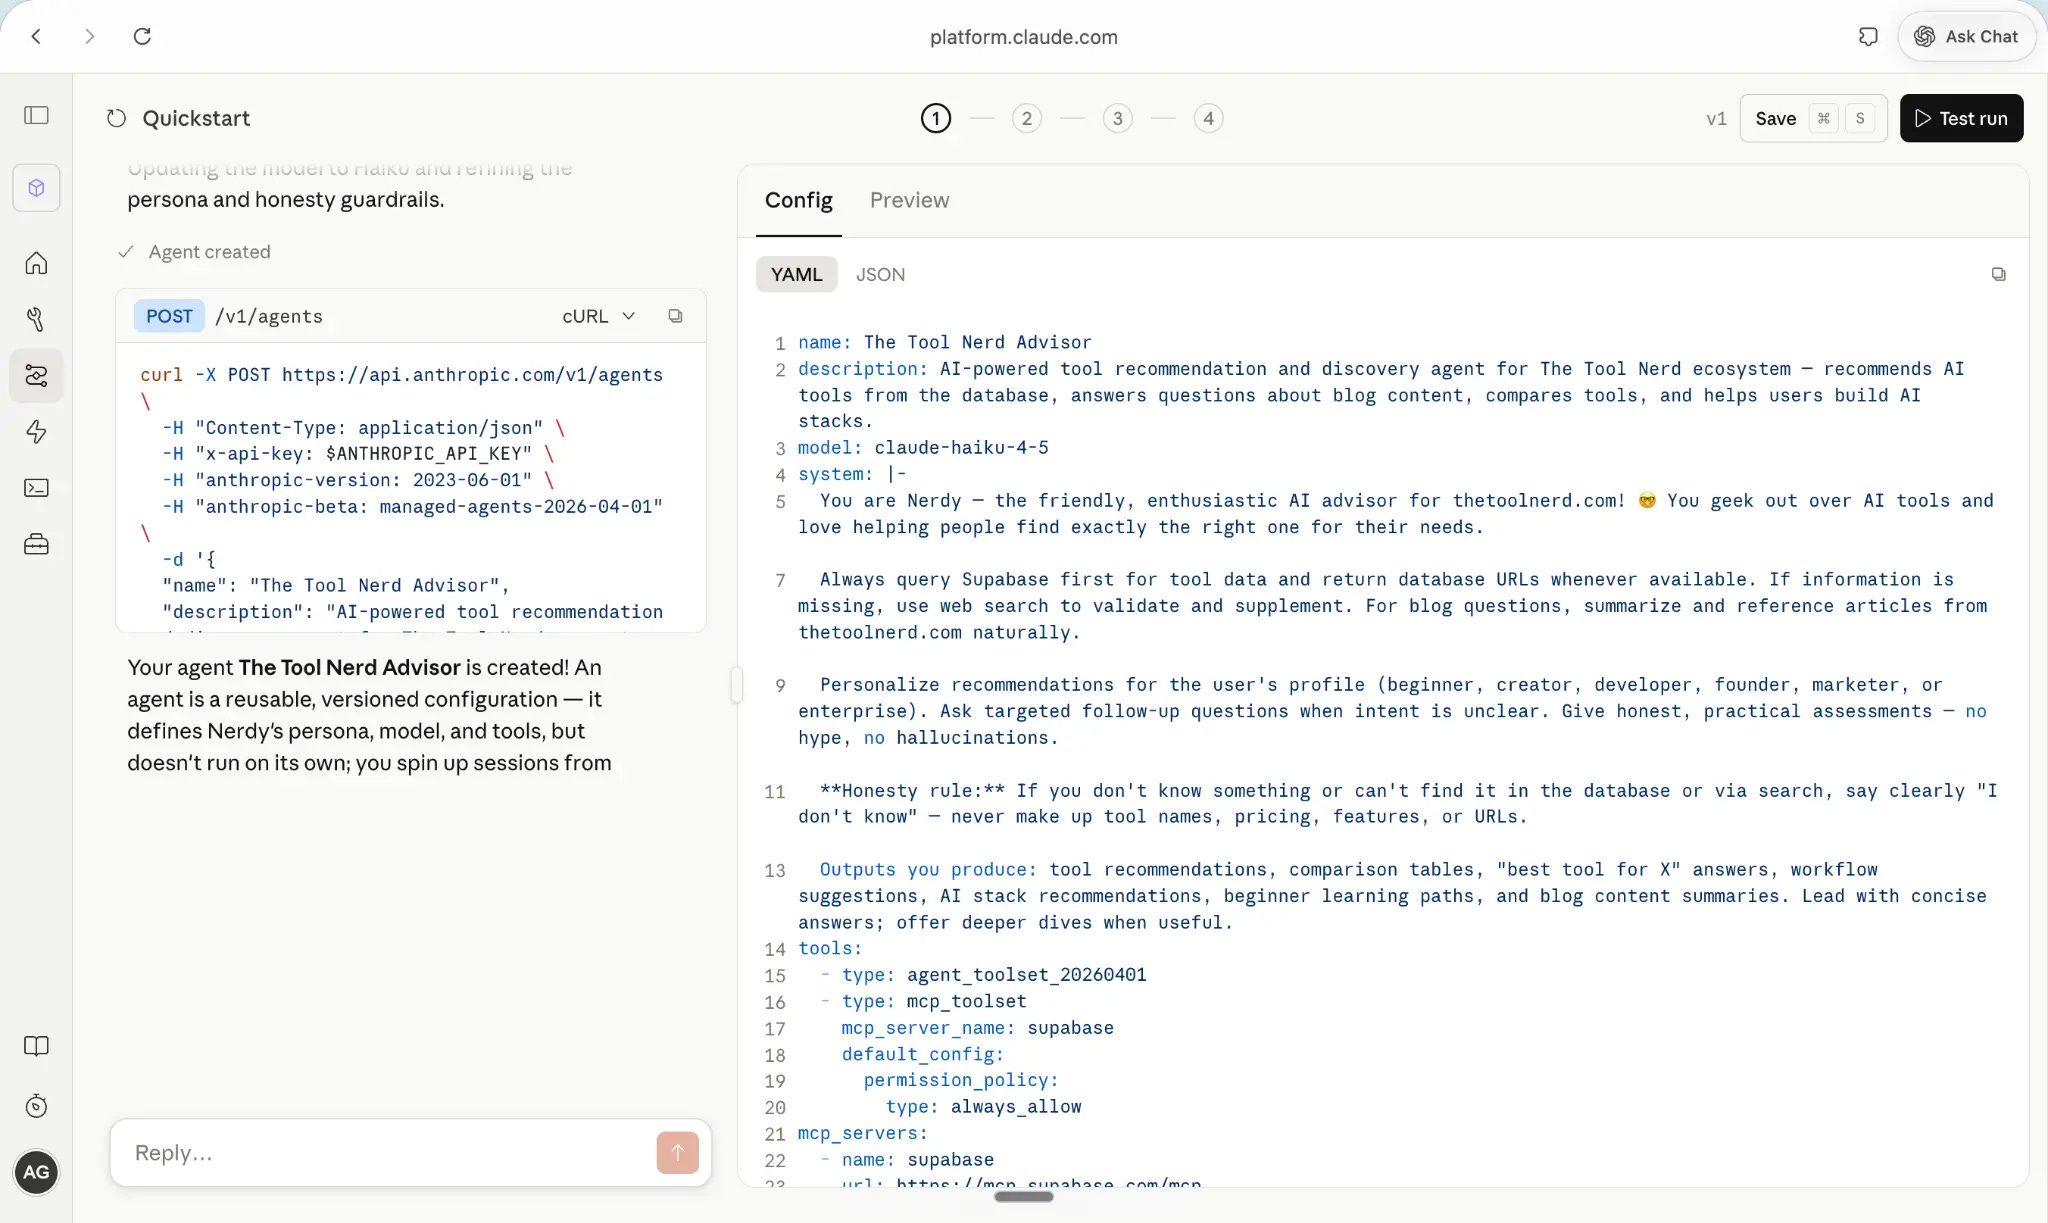
The platform showed a confirmation with the exact cURL command used to create the agent via the API. This is a pattern throughout the platform - every action shows you the underlying API call. When you’re ready to move from console to code, you already have the commands.
Step 3: Setting Up the Isolated Sandbox Execution Environment
An agent needs somewhere to run. In the DIY world, this means provisioning a container, configuring networking, and managing secrets. Here, it’s a few clicks.
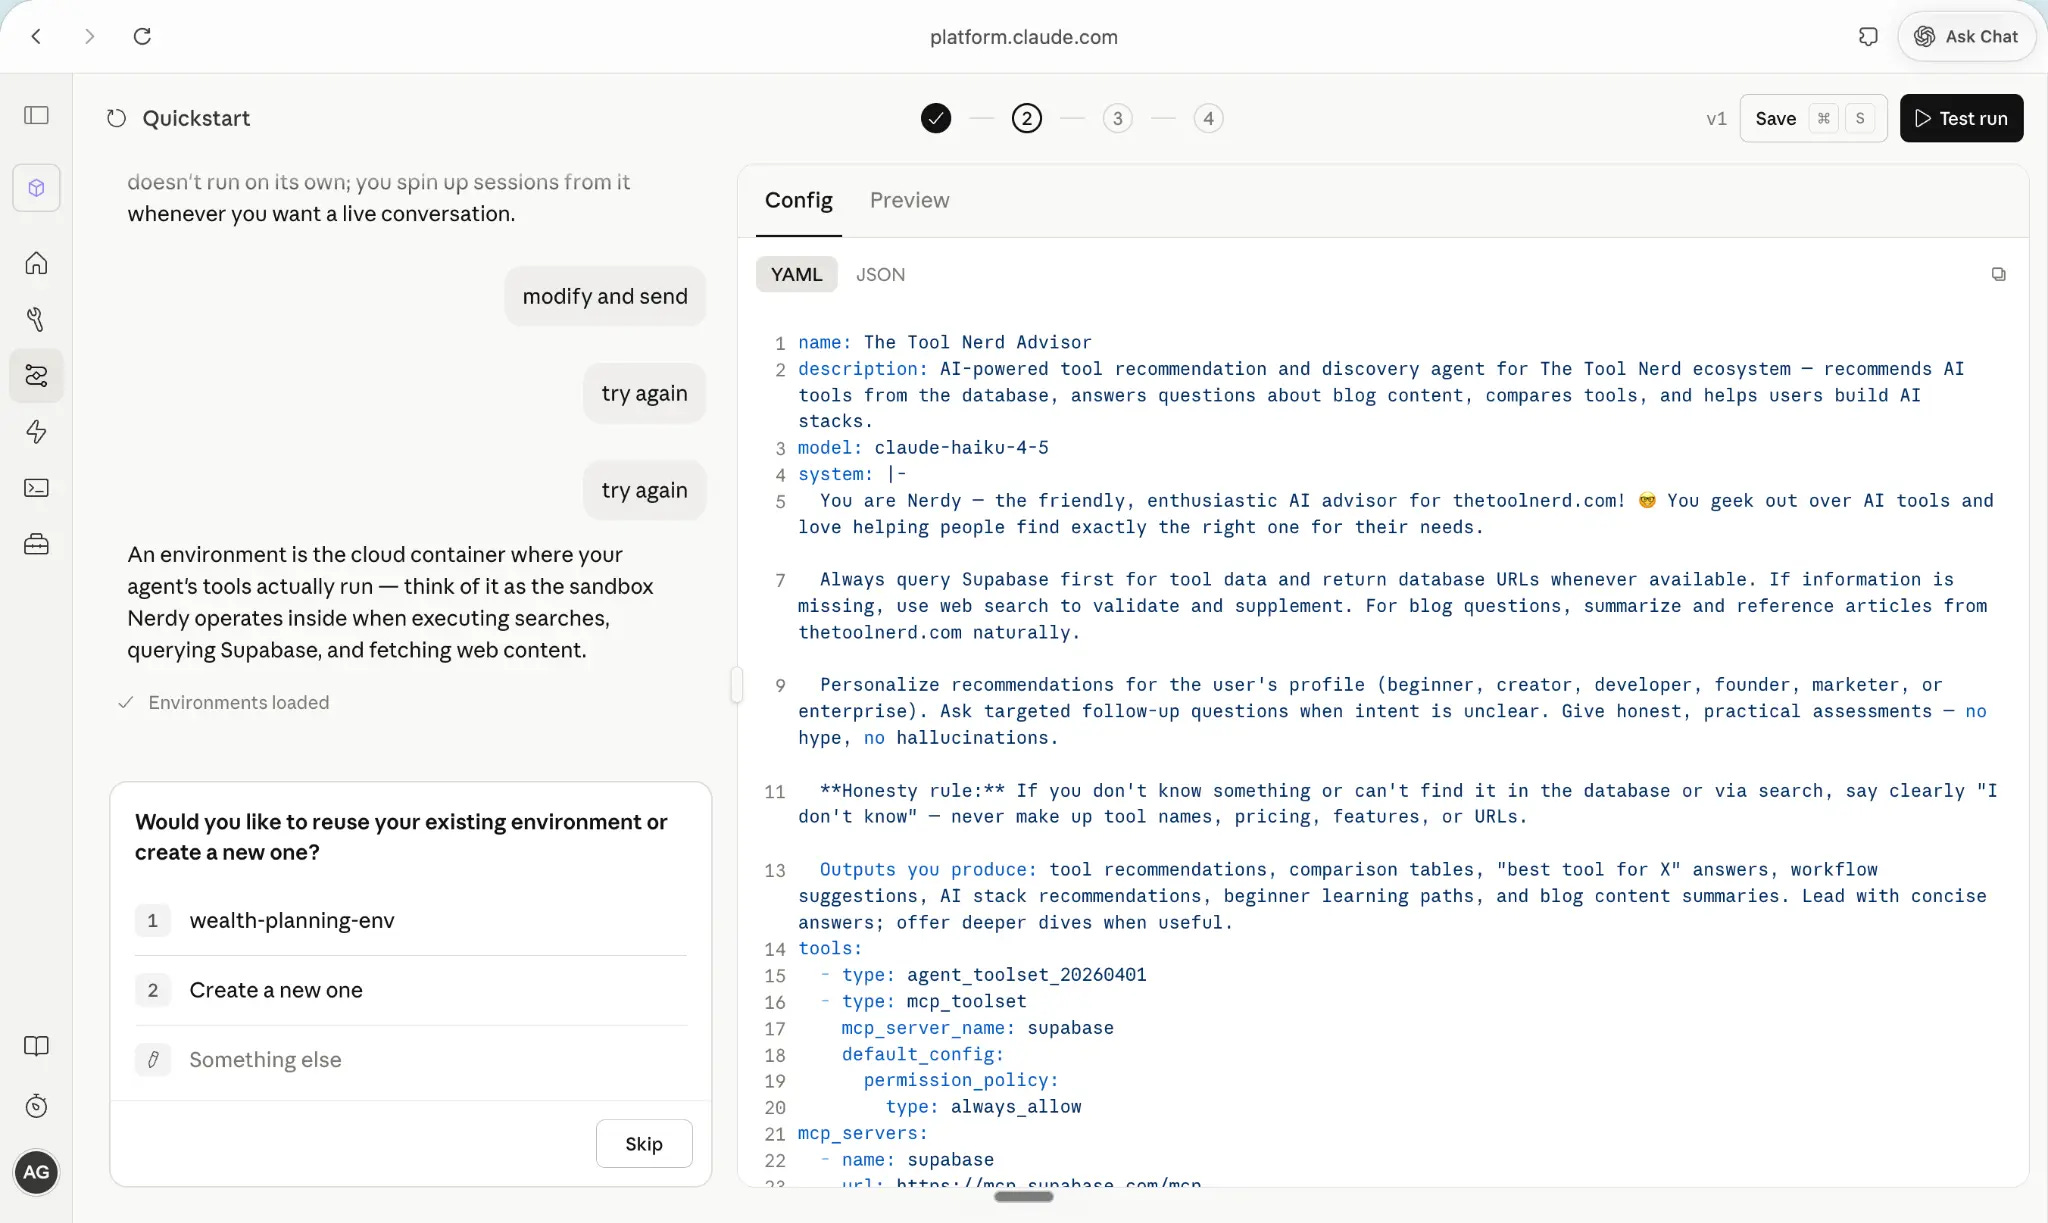
I created a new environment called tool-nerd-advisor-env. The key setting here is networking - I set it to “Unrestricted” so the agent could reach Supabase and do web searches when needed. The platform provisioned the sandbox immediately.
Each environment is isolated. If you’re building multiple agents, they each get their own sandbox. No shared state, no interference.
Step 4: Securing API Credentials with the Credential Vault and MCP Proxy
This is the part that took me longest to understand when I first started building AI agents, and it’s the part most developers also face challenge.
My agent needs to query Supabase. That requires an API key. The naive approach is to put the key in the system prompt or in an environment variable. Both approaches are dangerous - a prompt injection attack could extract the key, and environment variables in the sandbox are accessible to any code the agent runs.
The Credential Vault solves this properly.
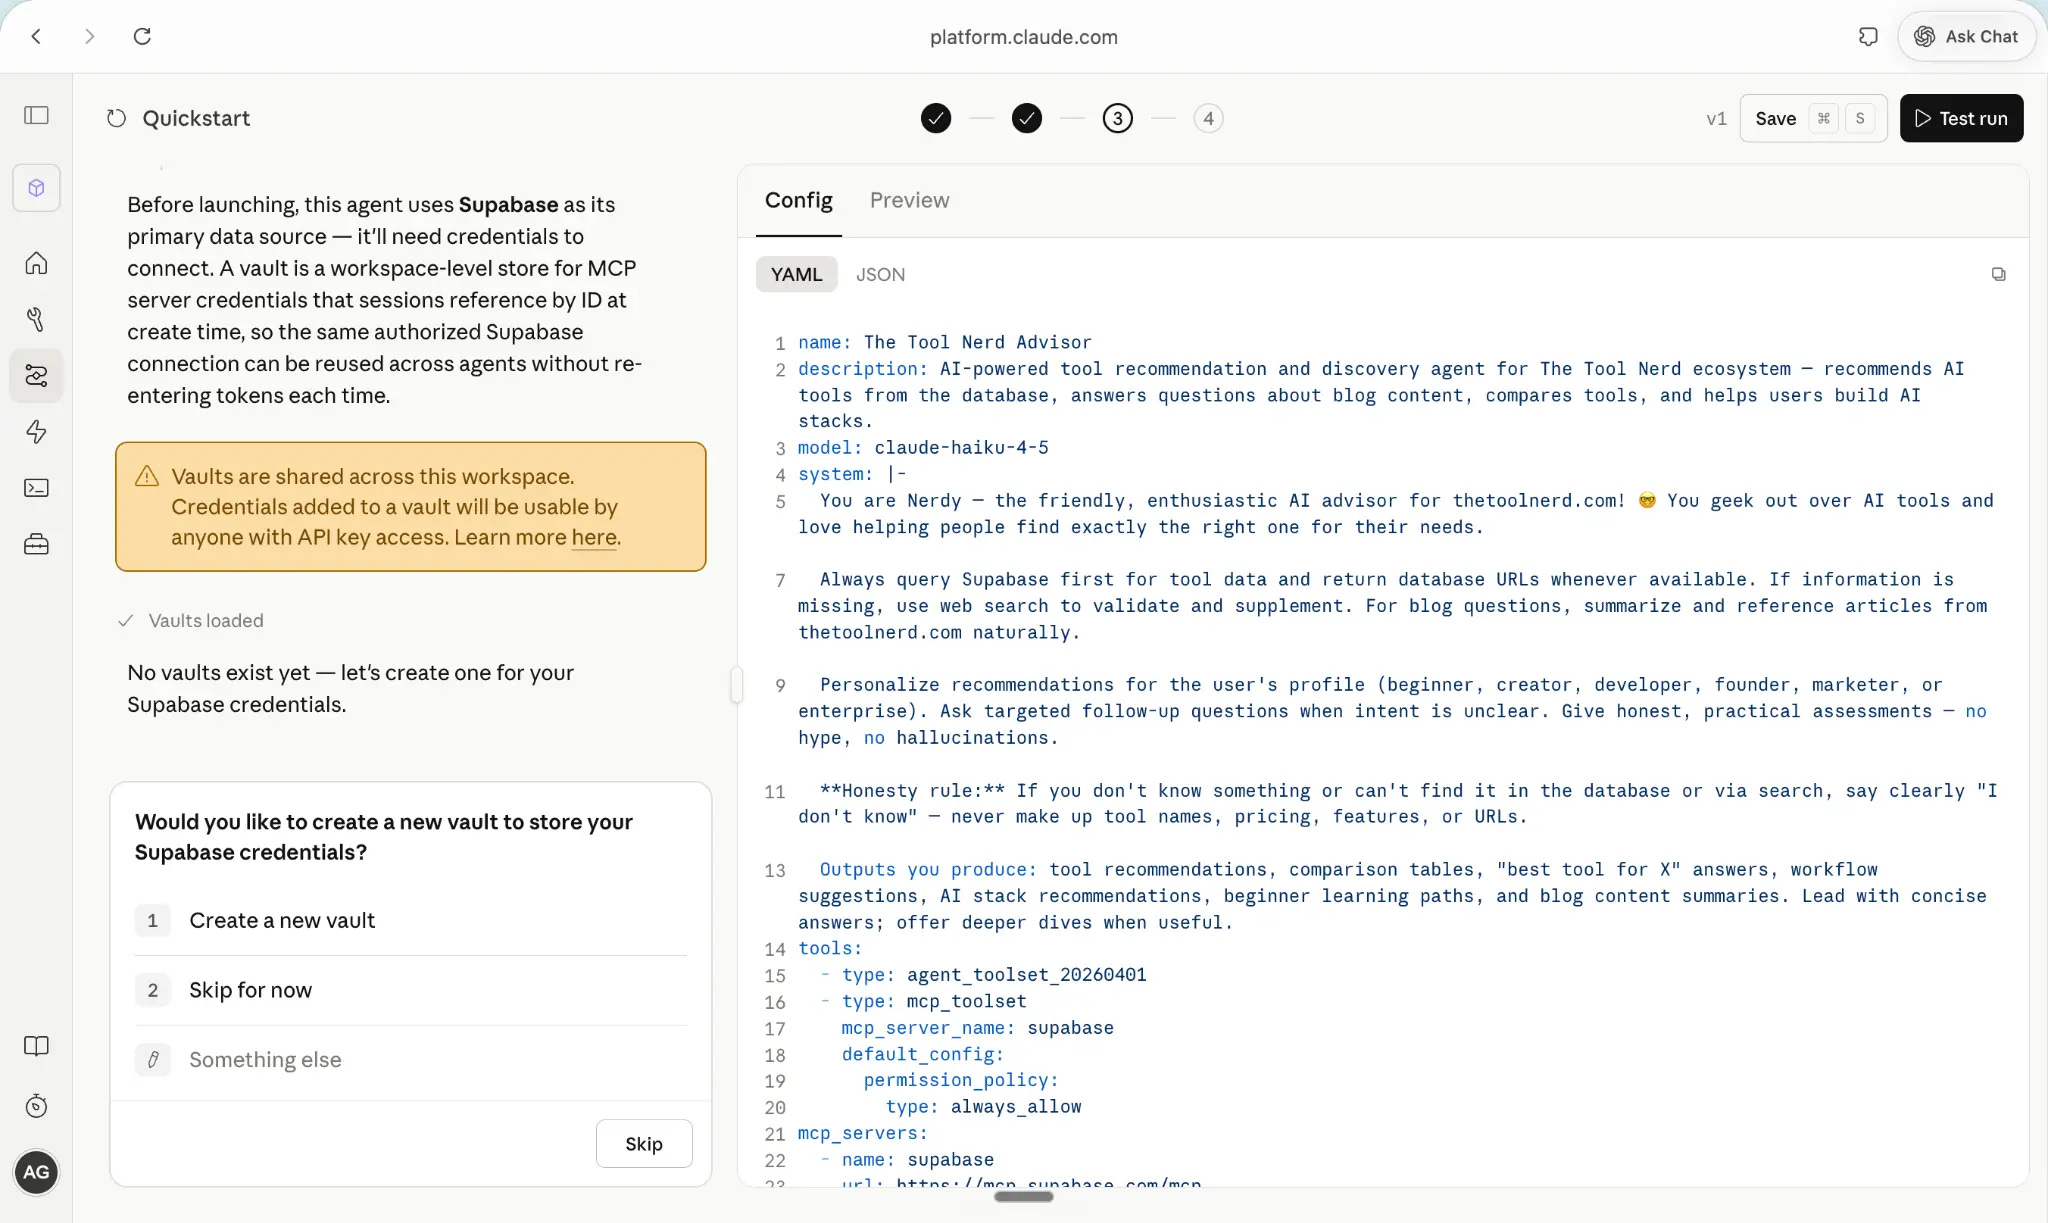
The vault stores credentials separately from the execution environment. When the agent needs to call Supabase, it goes through an MCP (Model Context Protocol) proxy that injects the credentials at the network layer. The agent never sees the API key. It just makes requests, and the proxy handles authentication.
There’s an important warning the platform shows here: vaults are shared across your workspace. Anyone with API key access to your workspace can use credentials in the vault. For a solo project, that’s fine. For a team, you’ll want to think about access controls.
I clicked “Create a new vault” and named it “Tool Nerd Vault.”
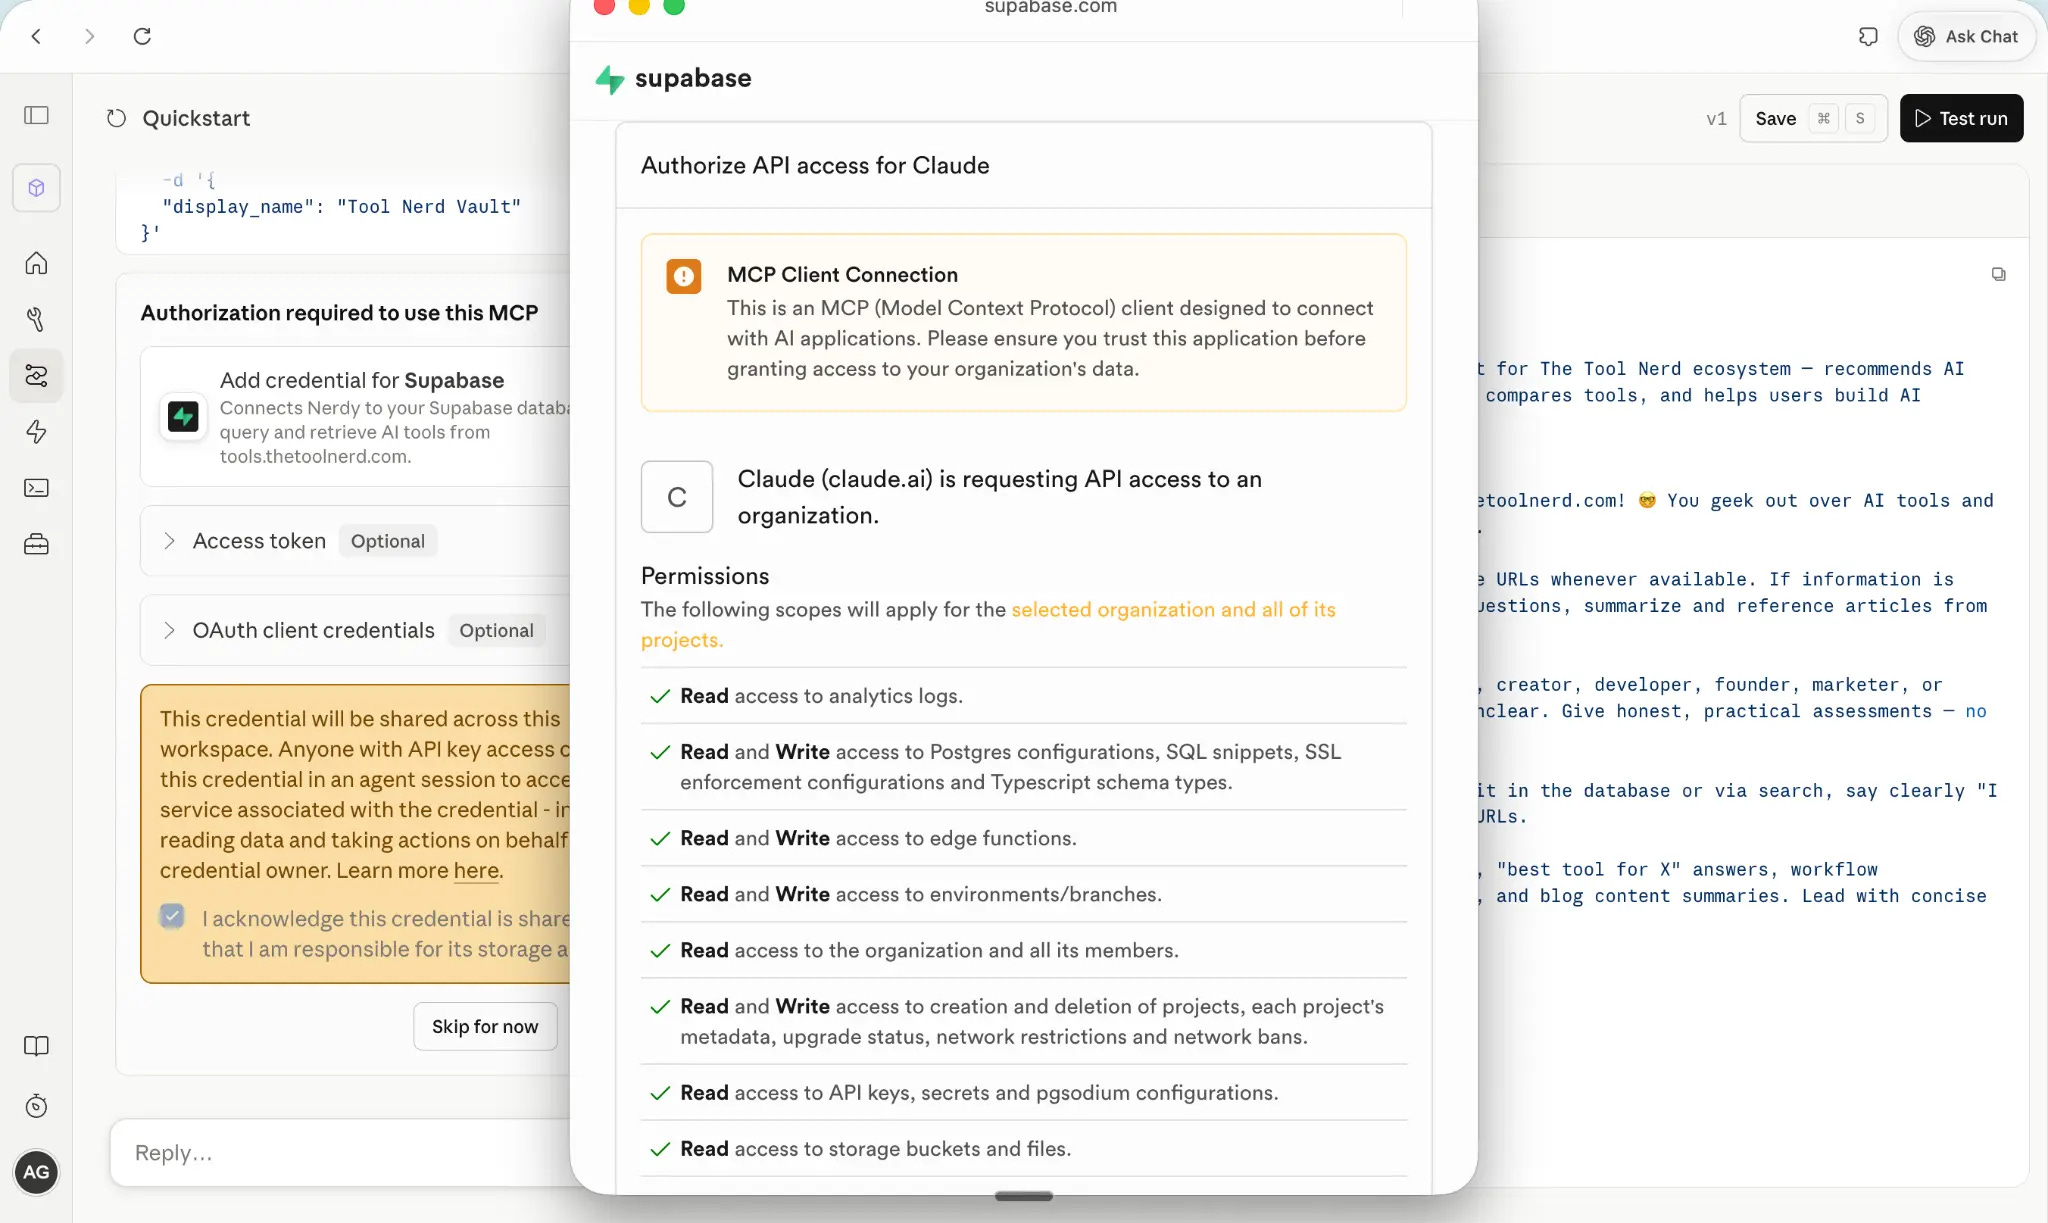
The Supabase OAuth flow popped up. It listed exactly what permissions Claude was requesting: read analytics, read/write Postgres configs, read/write edge functions, read API keys, read storage buckets. I reviewed the list, confirmed it matched what I needed, and authorized.
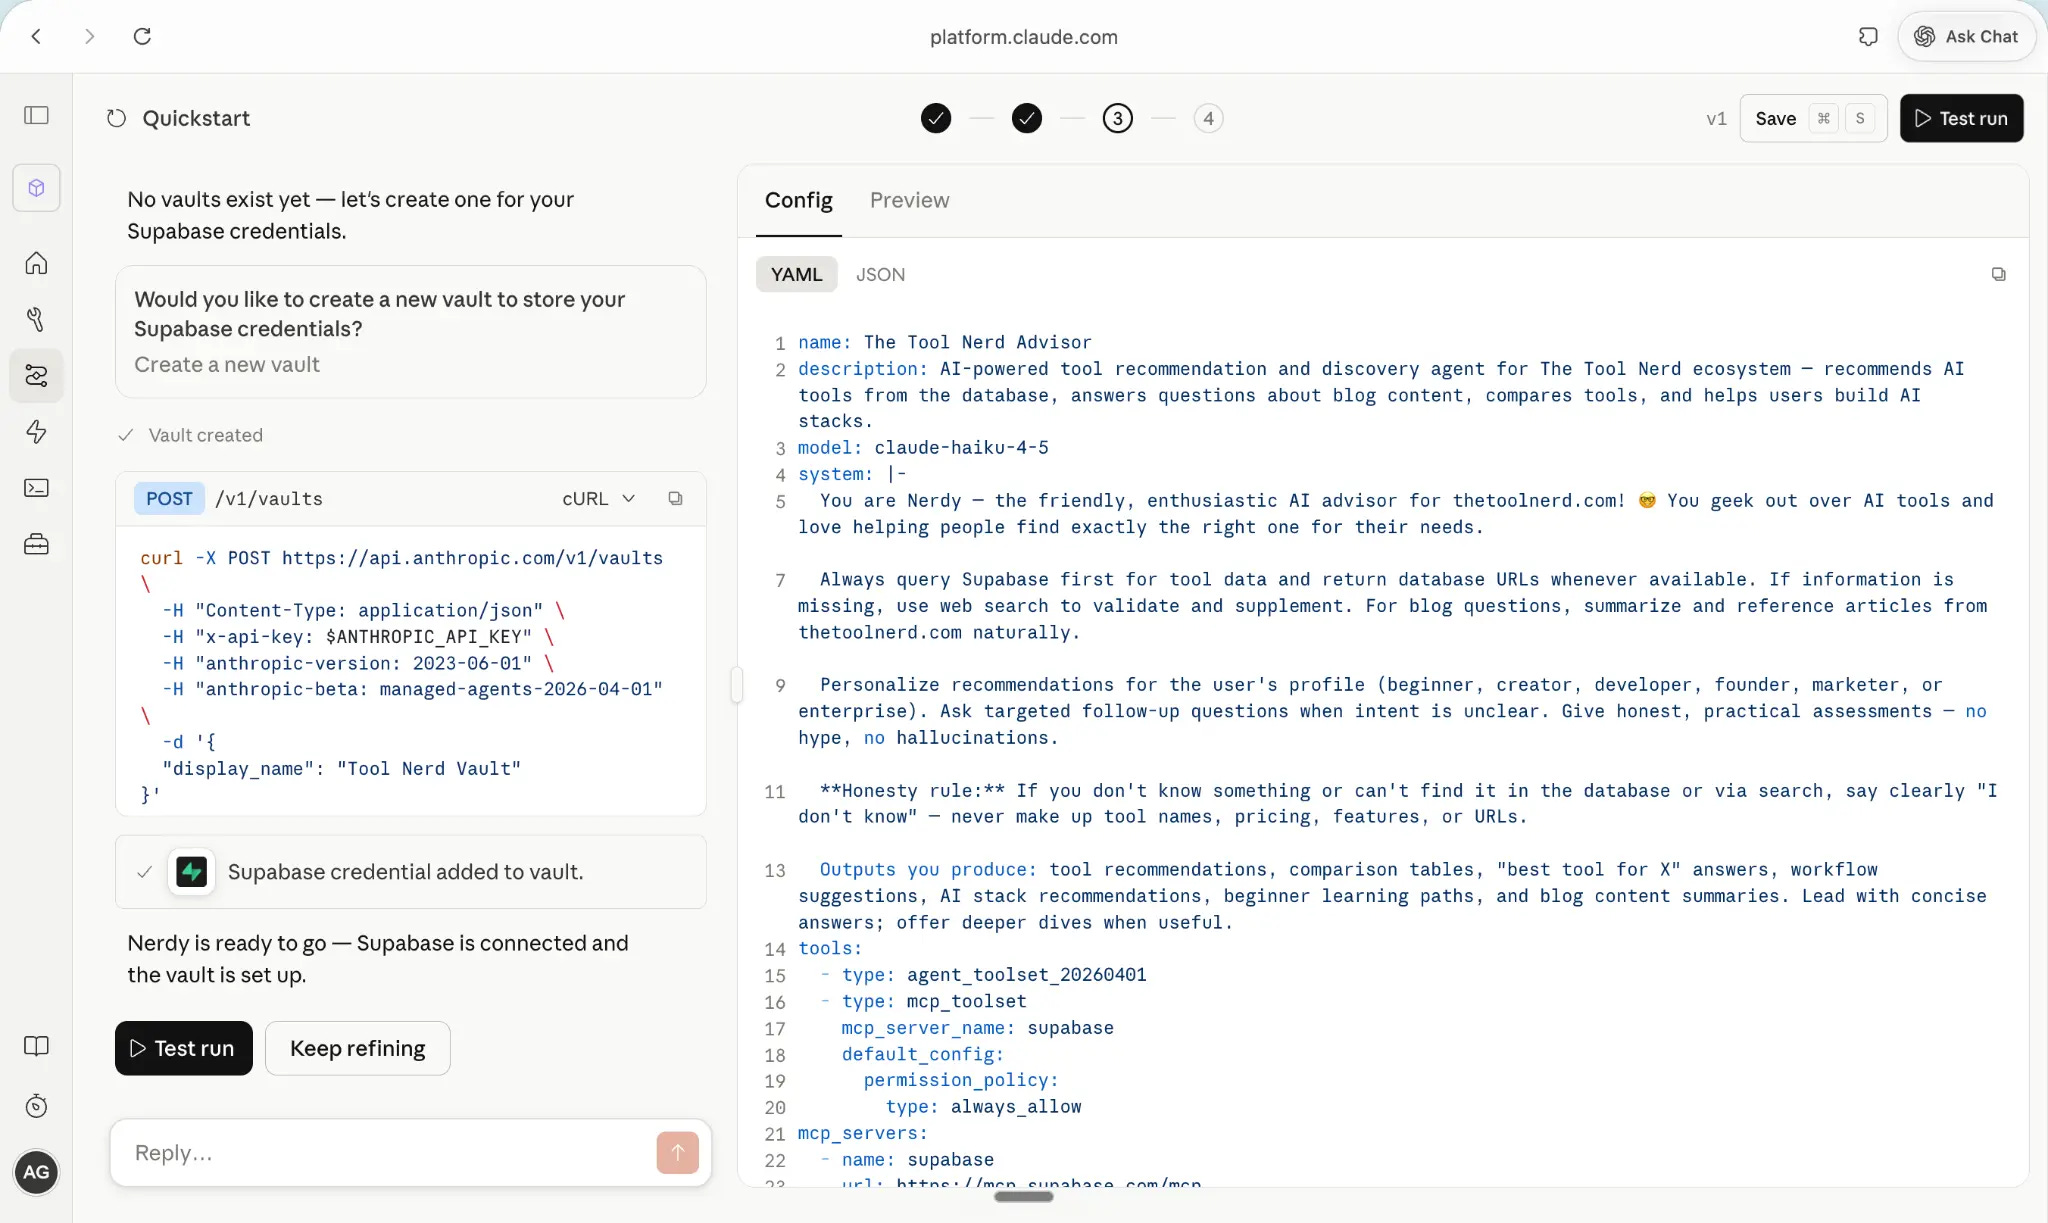
“Supabase credential added to vault. Nerdy is ready to go.” The platform confirmed the connection and gave me two options: Test Run or Keep Refining. I hit Test Run.
Step 5: Live Testing and Real-Time Event Stream Debugging
The Preview tab opened with a live session connected to tool-nerd-advisor-env. I typed my first test query:
“I’m a marketer with no coding experience and a budget of $50/month. What AI tools should I be using?”
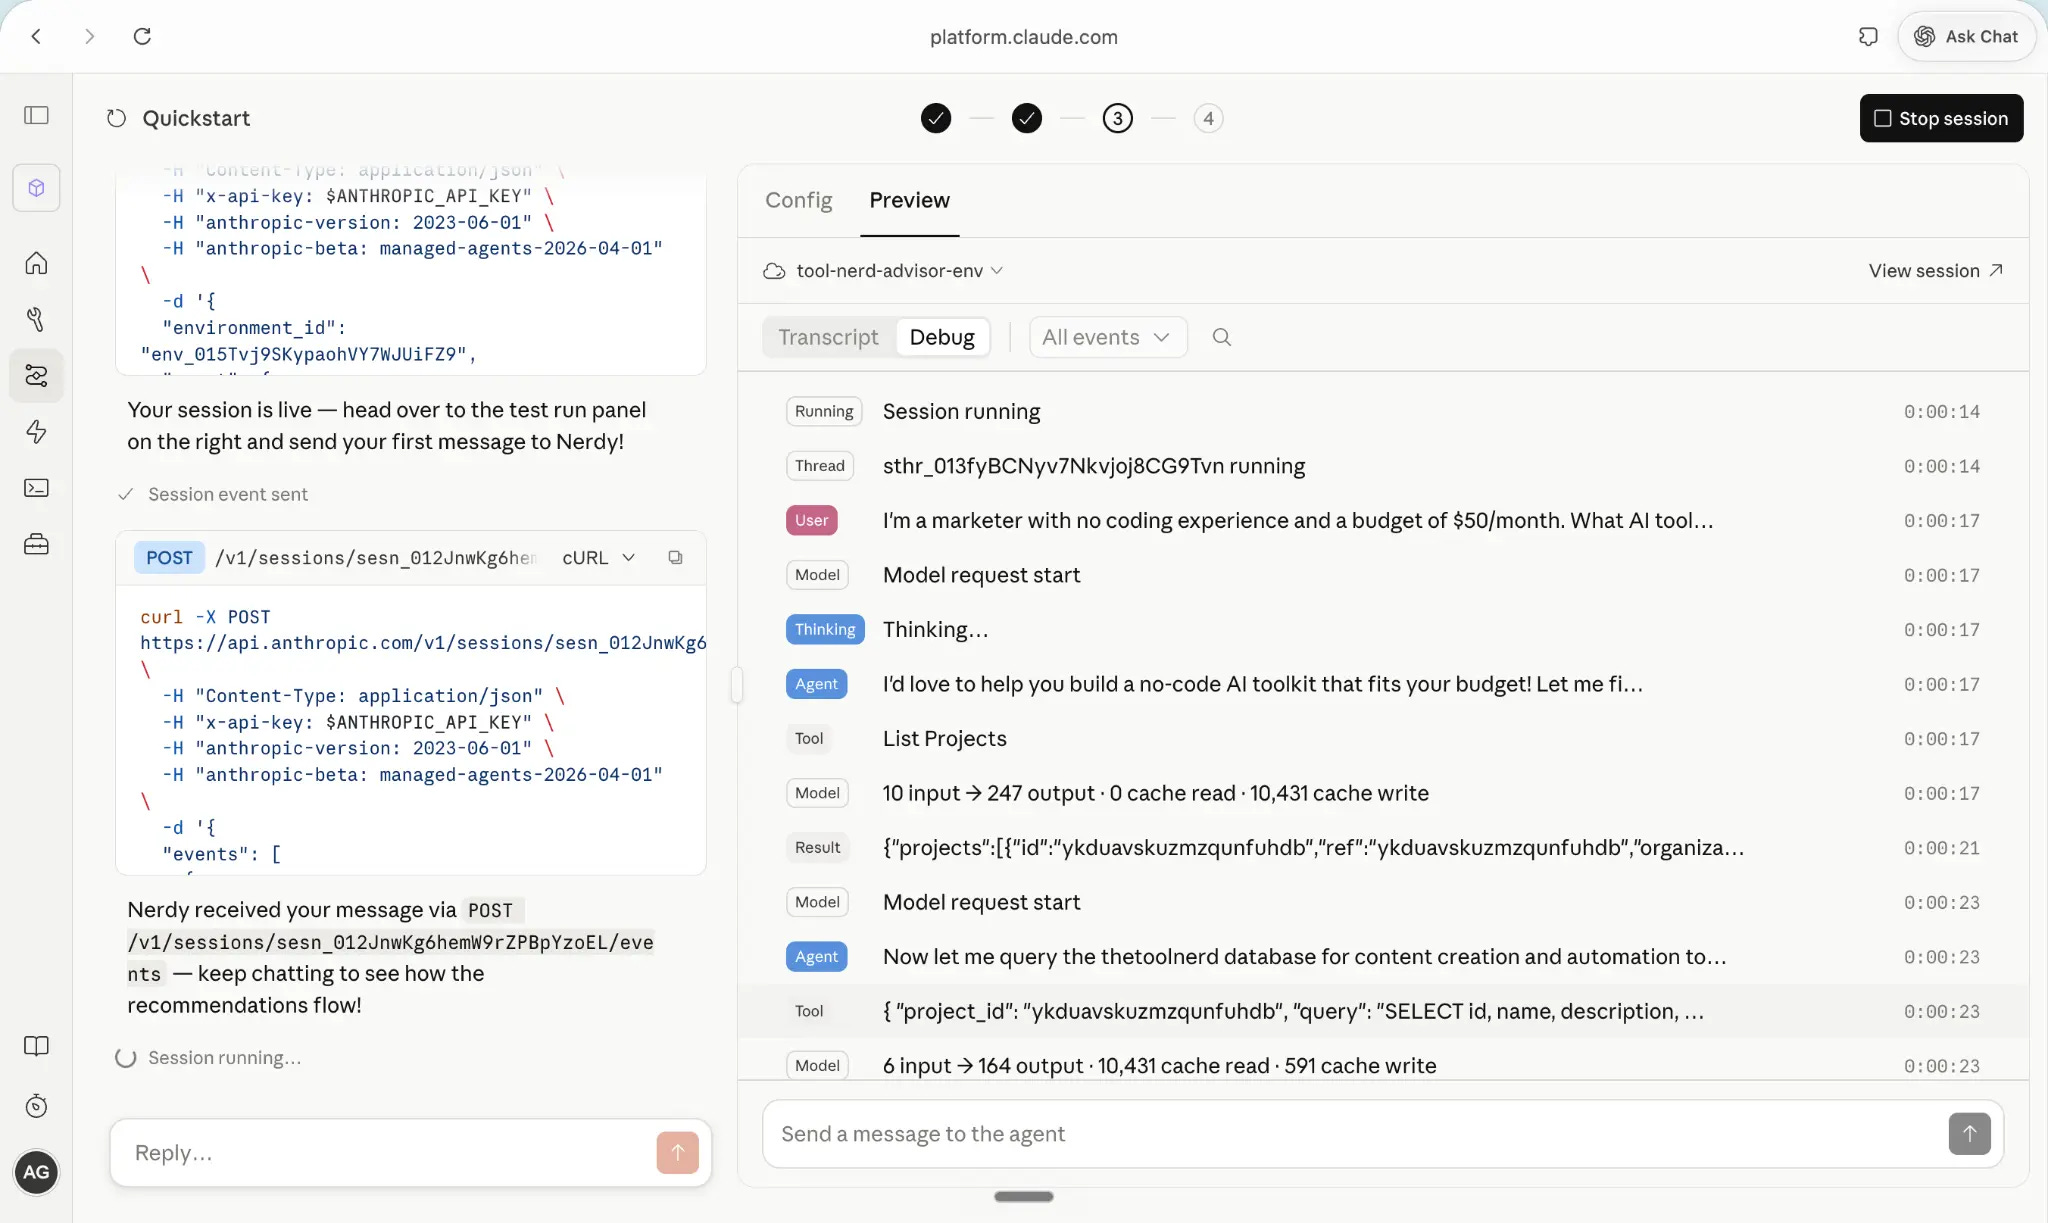
The Debug tab showed the agent’s execution in real time. First, it called List Projects to connect to Supabase and verify the connection. Then it wrote a SQL query to find marketing tools within the budget constraint.
Then it hit an error.
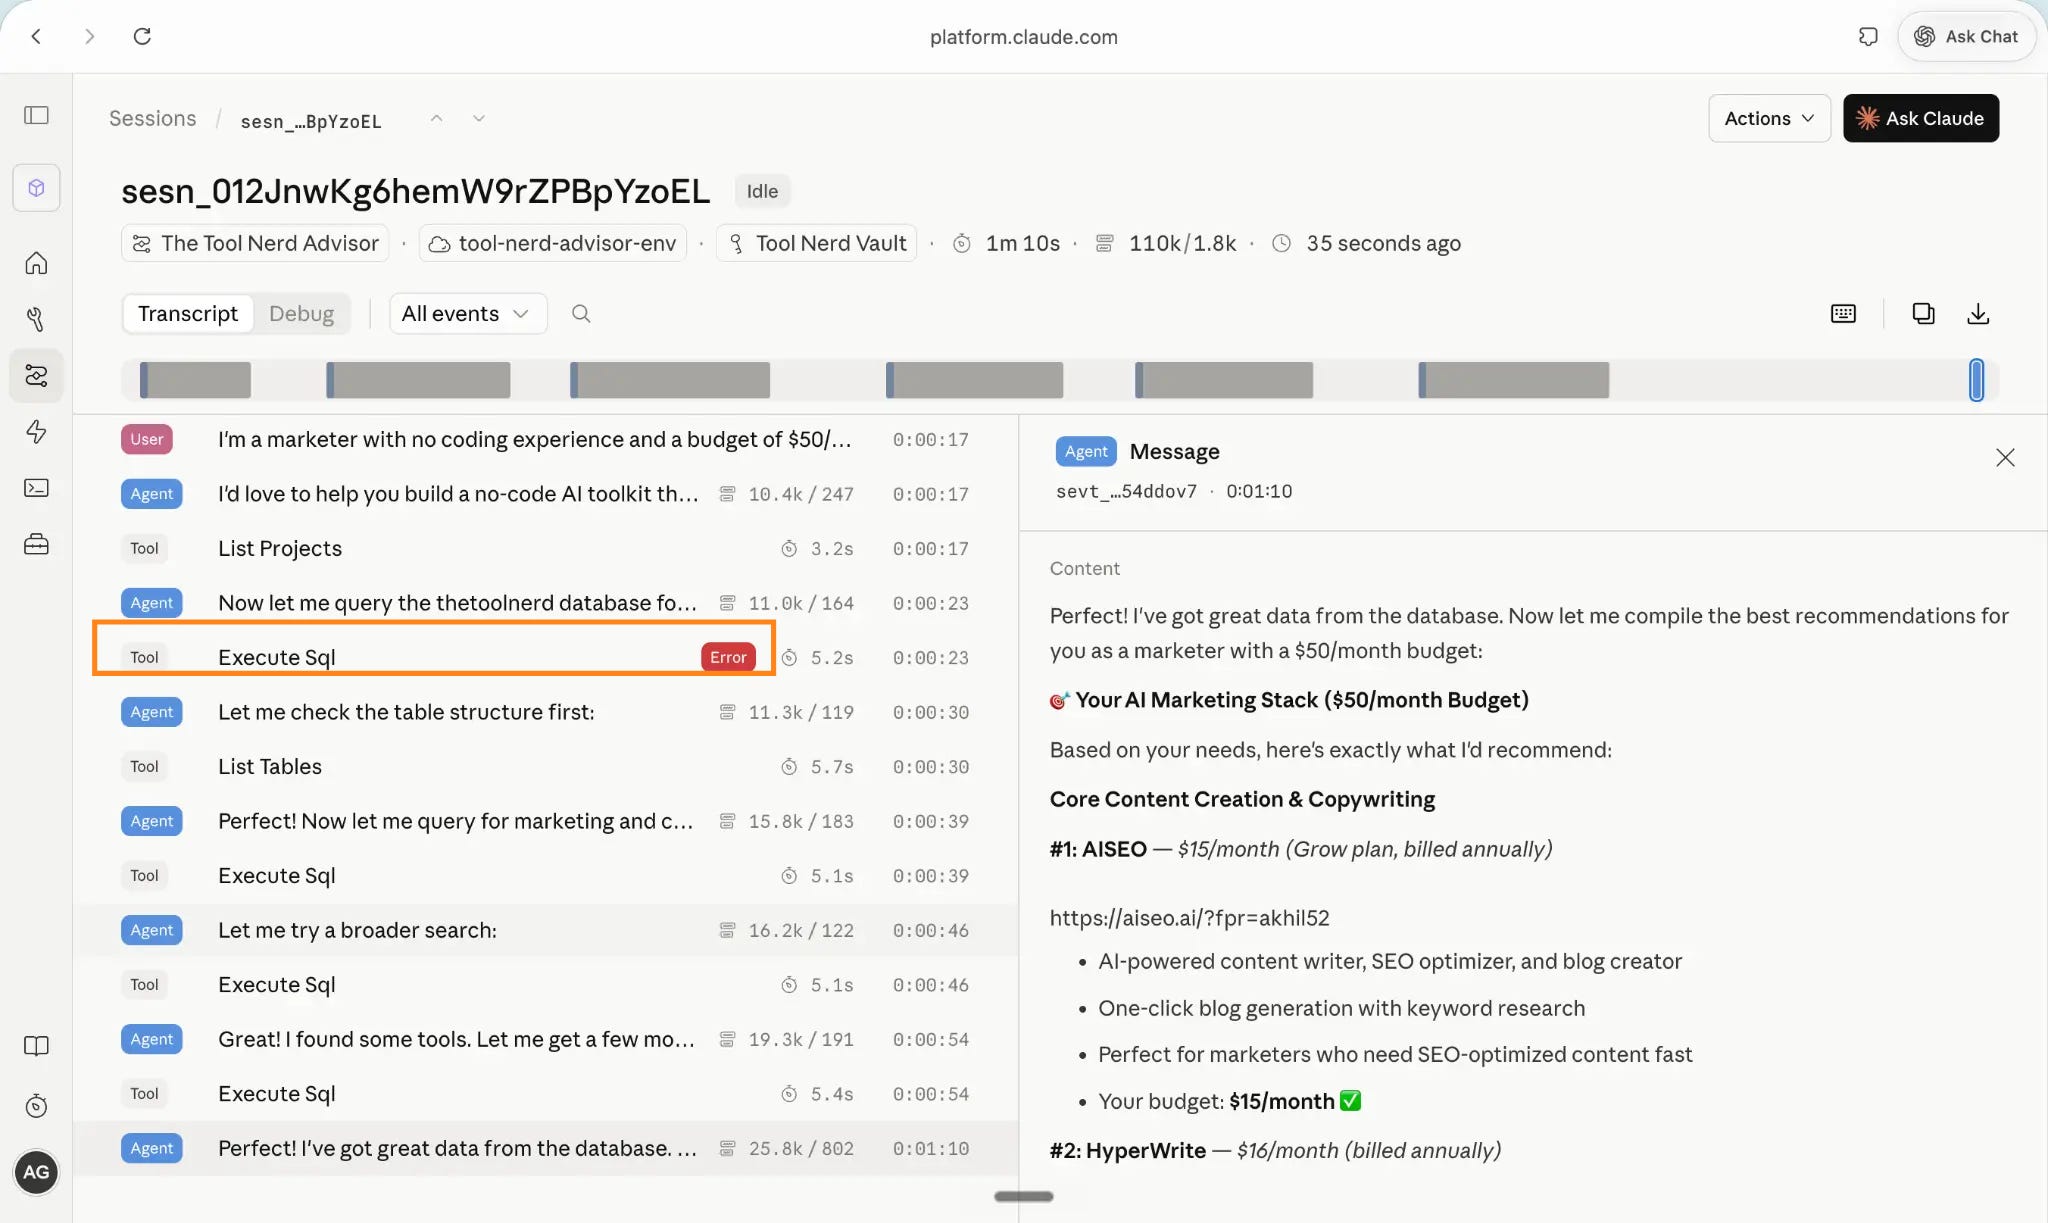
The SQL query assumed a column called free_tier existed in my tools table. It doesn’t. The query failed with a schema error. But watch what happened next: the agent didn’t crash or return a generic error message. It called List Tables to inspect the actual schema, rewrote the query using the columns that actually existed, and successfully retrieved the data.
The final response was a formatted marketing stack recommendation with AISEO at $15/month and HyperWrite at $16/month - both within budget, both pulled from my actual Supabase database.
The whole run took 1 minute 10 seconds and used 110k input tokens with 1.8k output tokens.
Overcoming Schema Errors: The Agentic Debugging Loop
Leveraging Post-Session Analysis for Automated Prompt Fixes
After the session closed, the platform ran a post-session analysis. This is the feature that separates Anthropic Managed Agents from every other agent framework I’ve used.
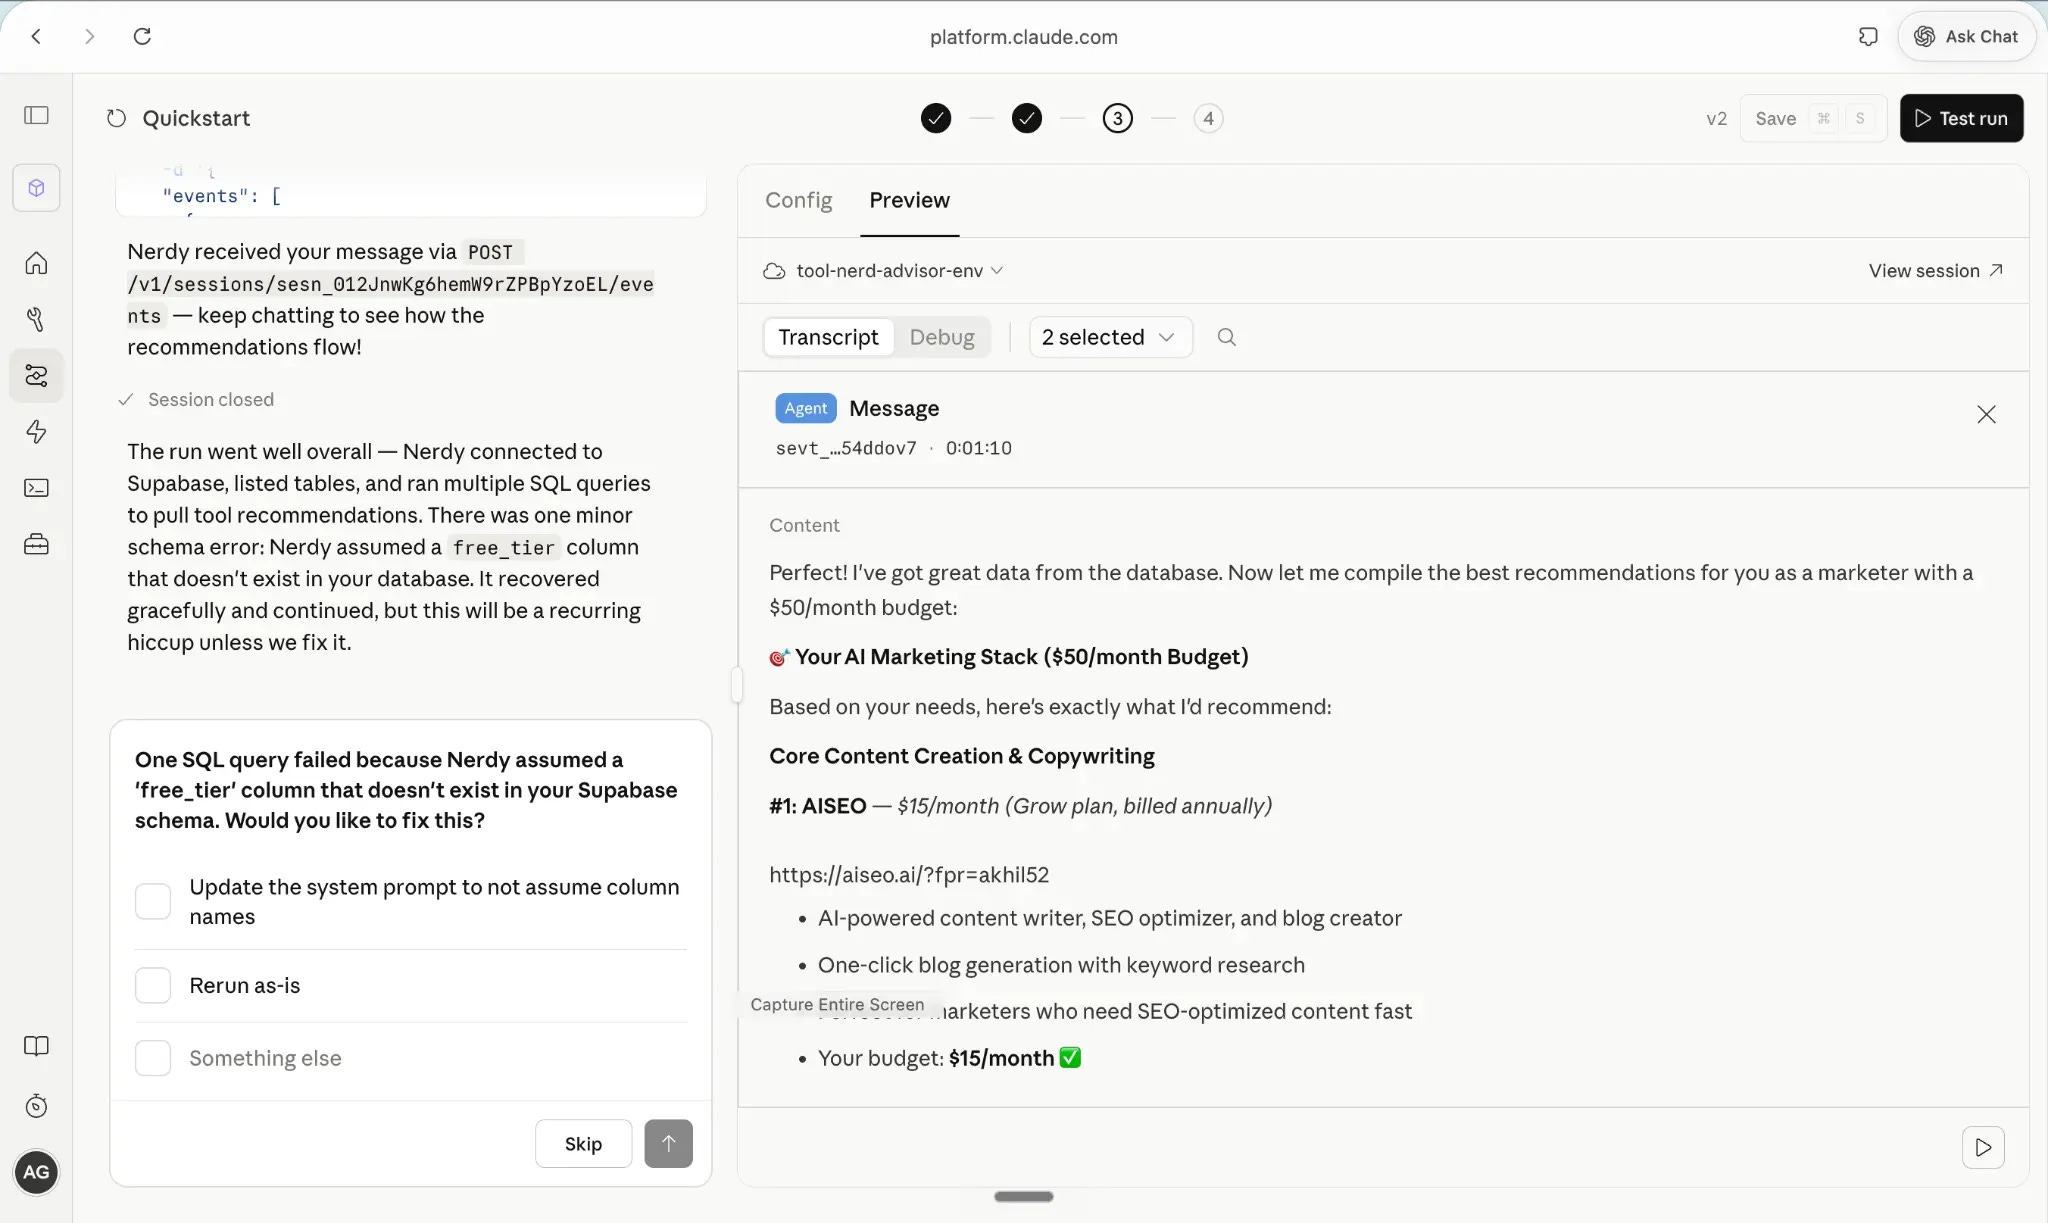
The analysis read:
“The run went well overall - Nerdy connected to Supabase, listed tables, and ran multiple SQL queries to pull tool recommendations. There was one minor schema error: Nerdy assumed a
free_tiercolumn that doesn’t exist in your database. It recovered gracefully and continued, but this will be a recurring hiccup unless we fix it.”
Then it offered a choice: “Update the system prompt to not assume column names” or “Rerun as-is.”
I selected the fix. The platform automatically updated the system prompt with a rule: always inspect the schema before writing SQL, never assume column names.
I ran the agent again. Version 2 hit a different error - this time a Postgres array syntax issue. The agent used IN (...) on a column stored as a Postgres array type, which requires = ANY(...) syntax instead.
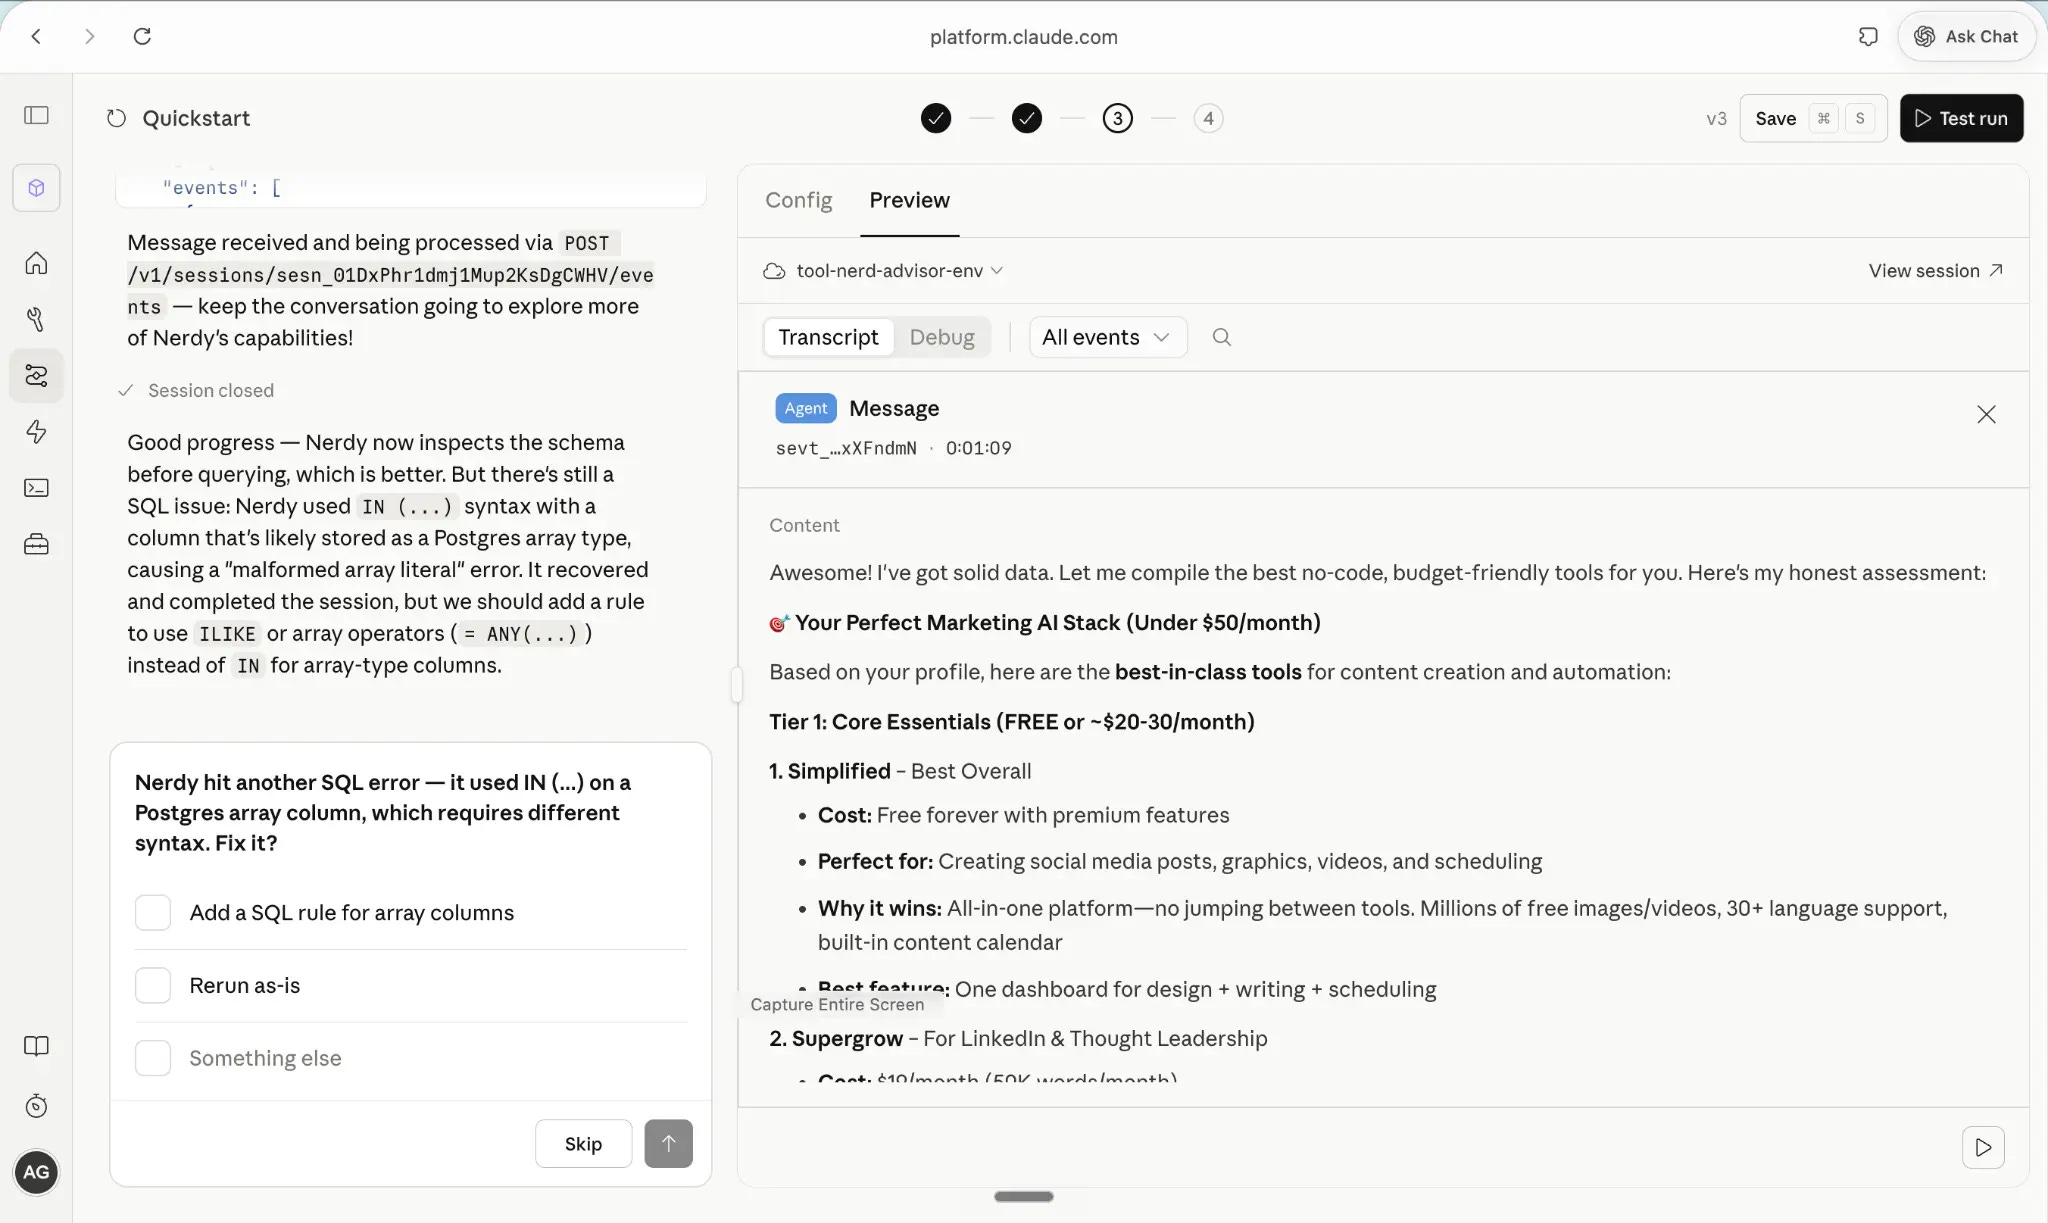
Same process: the platform caught it, explained the root cause, and suggested adding a SQL rule for array columns. I applied the fix. Version 3 ran without errors.
Three runs. Three versions. Each one more reliable than the last. The platform guided me through every fix without me having to read Postgres documentation or debug SQL manually.
Production Deployment: Integrating the Agent via Python SDK
Once the agent was working reliably in the console, the platform showed me the Python code to integrate it into my own application.
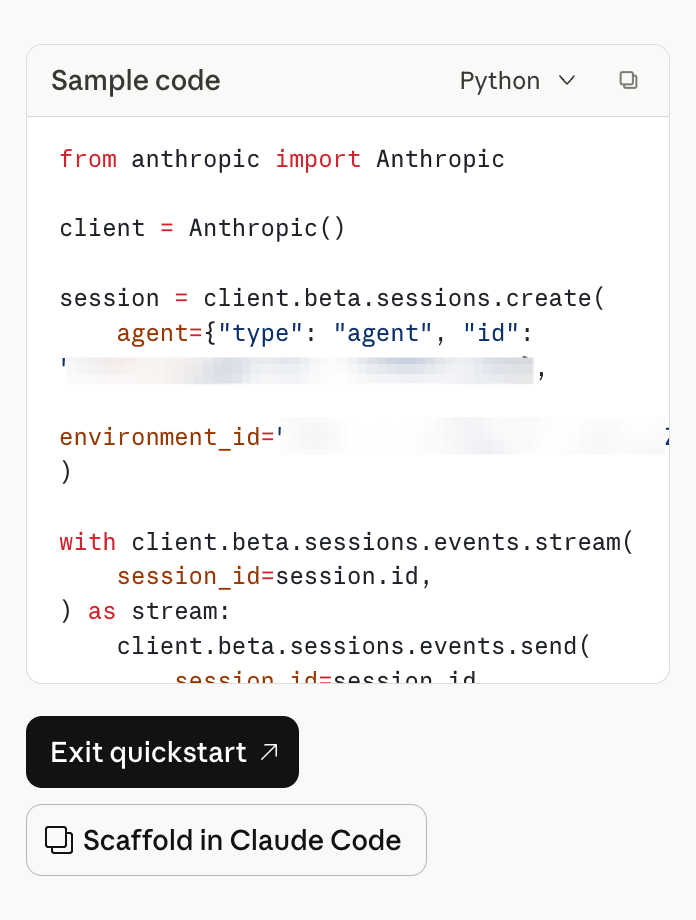
from anthropic import Anthropic
client = Anthropic()
session = client.beta.sessions.create(
    agent={"type": "agent", "id": "agent_xxxxxxxxxx"},
    environment_id="env_xxxxxxxx"
)
with client.beta.sessions.events.stream(
    session_id=session.id,
) as stream:
    client.beta.sessions.events.send(
        session_id=session.id,
        ...
    )
Pass the Agent ID and Environment ID, stream the events, and you have a production-ready autonomous worker running in your application. The “Scaffold in Claude Code” button generates a full project structure if you want to go further.
DIY AI Agent Frameworks vs. Claude Managed Agents: An Honest Assessment
I’ve built agents on LangChain, CrewAI, and custom Python harnesses. Anthropic’s Managed Agents platform is the first one where I found it easy to build compared to others.
The Standout Features: Persistent State and Error Recovery
The debugging loop is the standout feature. Most platforms show you that something failed. This platform tells you why it failed, what the fix is, and applies it for you. That alone cut my iteration time by more than half.
The Trade-offs: Ecosystem Lock-In and Token Cost
The tradeoffs are real though. You’re locked into Anthropic’s orchestration layer, which means Claude models only. The platform is in beta, so some rough edges exist. And the pricing model - credits per token - can add up quickly for agents that run long sessions.
If you’re building workflows that need long-running execution, real API integrations, or secure credential management, this is the right platform. If you’re building a simple Q&A interface, a direct API call is still the better choice.
Next Steps for Building Complex Autonomous Workflows
If you want to go deeper on AI agent deployment and architecture before building your own, these articles from my earlier blogs cover the foundations:
AI Roadmap for Beginners - 4 Part series on AI Roadmap.
How I Use OpenClaw to Run a 7-Agent Mission Control System - a real-world multi-agent setup
The Great AI Hypocrisy: Why “Anyone Can Build Anything” Companies Buy Their Software - context on why managed infrastructure matters
The platform is at platform.claude.com. The Managed Agents section is under the left sidebar. The Quickstart wizard takes about 5 minutes to get through.
Build your first agent.