
I Tested Claude Code for a Week - Here's What I Found
My experience of building with Claude Code, being a no-coder and completely new to Terminal Experience. Step-by-step guide for Claude Code. It's faster to learn than I thought.

As someone who is always brimming with product ideas but lacks coding skills, I've been closely following AI coding tools. When Anthropic launched Claude Code in May 2025, everyone was going crazy about it. Every developer I follow was calling it amazing and the future of AI development.
But I was scared to try it.
Not because of the AI part (I'm all in on that), but because Claude Code is terminal-only. Coming from Cursor, Windsurf, and VS Code with their nice interfaces, the thought of coding through command lines felt like going backwards. If you are like me, then this blog might help you take that step.

Plus, it was initially locked behind Anthropic's expensive plan (around $200), which made it even harder for someone like me.
No Time to Read? Here's the Scoop
What Claude Code Is:
Terminal-based AI coding assistant with superpowers
Just $20/month on Anthropic's Pro plan
Connects to MCPs
Key Benefits:
Solves complex problems where others fail
One prompt = massive code transformations
Thinks before it codes with step-by-step planning
Automates your workflow exactly how you want with Custom Commands
Honest Limitations:
Terminal interface isn't as bad as I expected.
Pro plan only gets Sonnet 4 (not the advanced Opus 4).
Rate limits: around 50 prompts every 5 hrs ( Good for people like us, who are part-time coders)
What Got Me to Try Claude Code Finally
It was when Anthropic moved Claude Code to their $20 Pro plan instead of the expensive tier. Suddenly, the FOMO hit hard.
But it wasn't just Claude Code. Anthropic had been releasing several cool features:
Voice Mode in Mobile App
Direct integrations with other tools via MCP
Better coding capabilities overall with Claude 4 - Opus & Sonnet
I'd tried Claude Pro many months back to test MCP features, but had been using ChatGPT for most of my daily tasks since then. But Claude Code was what got me to take the Pro plan again.
If you want to understand more about Claude 4's capabilities that power Claude Code, check out my detailed analysis: Claude 4 is Here and It's Redefining AI Development
The Terminal Learning Curve (Honest Truth)
Let’s start with my learning and setup experience . Claude Code needs a Unix-like environment. You'll need WSL (Windows Subsystem for Linux). I tried on Windows first and I couldn’t make it work. Switched to Mac and it worked perfectly.
If you want to know how to setup —> I have given a step-by-step guide at the bottom of this article.
Day 1 : Started with installation and basic commands. Terminal felt unfamiliar but manageable - not as scary as I expected. Followed the installation steps in the support docs : OfficialClaude Code Installation Guide
Days 2-3: Tried small changes on my resume builder project. Everything took longer than my usual GUI workflow. Every time I wanted something, or try, I wanted to be doubly sure that it doesn’t mess-up the code. I was just getting used to the ‘/” slash command options.
Days 4-5: Started tweaking with few changes as I started getting a hands-on with how Claude Code works, thinks. How to give better instructions to it. Instead of fighting the terminal, I began describing what I wanted in plain English.
Day 6-7 : Gained confidence and started making bigger architectural changes. The planning-first approach finally clicked. Made changes like UI revamp, Data Schema Changes.
Week Summary: By the end of the week, I was reaching for Claude Code for complex tasks while still using GUI tools for quick edits.
The learning curve is real but much shorter than expected. I got comfortable in just a week of focused experimentation - not the months I initially feared, and that too like a 30 min to hr a day (that’s the only time I get sometimes)
My Real Success Story with Claude Code
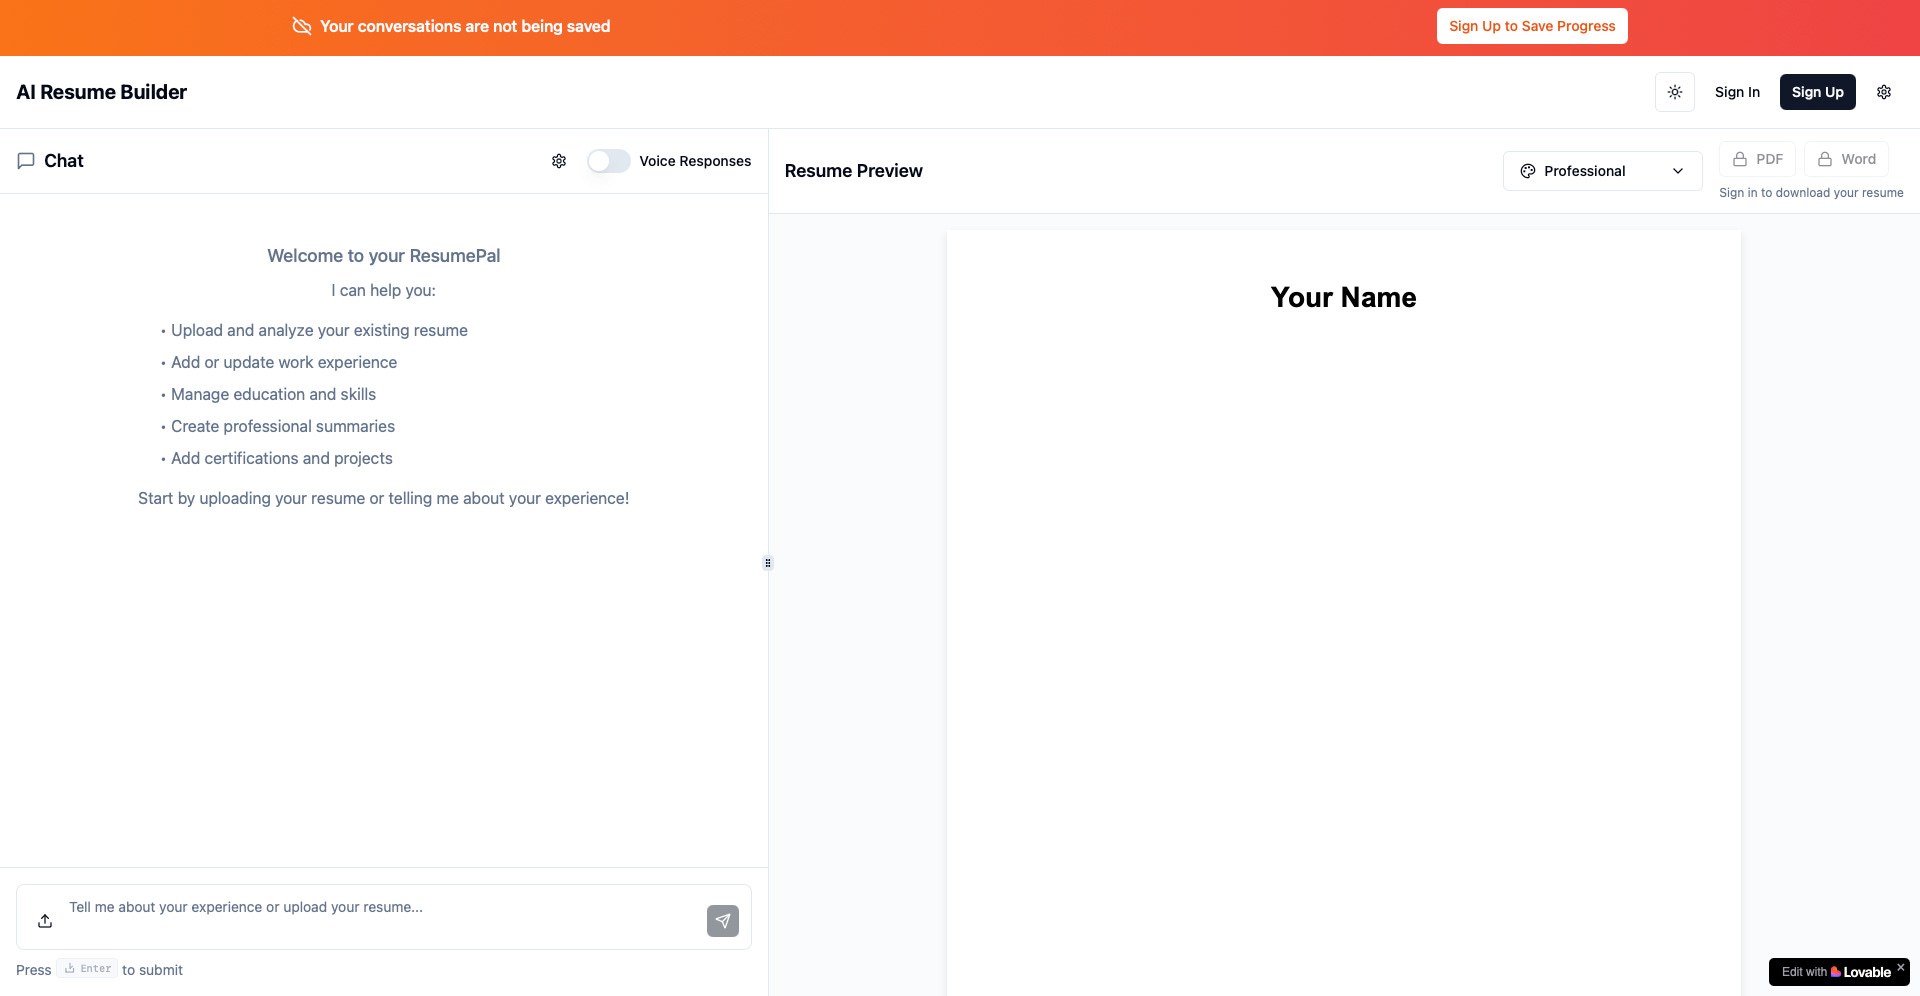
I'd been working on a resume builder app where users can build their resumes with having a natural voice-powered conversation or chat conversation with a real-time preview of the resume as one builds. It had voice-related bugs that I couldn't fix with Lovable after multiple attempts.
These weren't simple bugs. They were complex issues between voice processing, database updates, and UI rendering.
Claude Code fixed them in just a couple of tries.
Here's what impressed me:
It analysed my entire codebase, not just the files I mentioned
Found the root cause
Fixed it without breaking other things ( this is the most important part )
After that success, I tried bigger challenges:
Complete UI redesigns - done in a couple of prompts
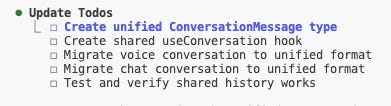
Technical Issues - Maintaining Shared context across Voice and Chat , which needed a whole restructure of the code.
The difference was clear. Other AI tools needed multiple tries and manual fixes. Claude Code just understood complex, connected systems better.

So, how Claude Code Actually Works
The workflow is really natural. You don't need fancy prompts. Just describe what you want:
"Add a feature for users to upload profile pictures and show them in the resume"
Claude Code doesn't start coding right away. It begins with planning:
Analyzes your request in context of your whole project

Creates a todo list of what needs to be done
Works through each task one by one

Tests each step before moving to the next
Makes sure everything works together


This systematic approach means you don't get partial solutions that break other parts of your app.
3 Things That Make Claude Code Stand Out
1. Custom Commands for Your Workflows
You can create your own /commands for things you do often. There are two levels:
User-level commands - work across all your projects Project-level commands - specific to individual projects
This is like Cursor's global vs project rules, but for entire workflows.
Example custom commands:
/fix-issue- step by step process for fixing the code for any issue/component- create components following your patterns/security- specific workflow for fixing security issues
Refer this guideline to setup: https://docs.anthropic.com/en/docs/claude-code/common-workflows#create-project-specific-commands
2. MCP Integrations with Your Tools
Claude Code connects to your other tools through MCP:
Claude Code integrates with these tools and many others via remote MCP (Model Context Protocol) servers:
Official Integrations Available:
Zapier - connects to thousands of apps with pre-built workflows
GitHub - direct repo access, handles PRs, issues, and commit history
Linear - project management with real-time context
Atlassian - Jira and Confluence integration
Sentry - error tracking and debugging context
Cloudflare - deploy and manage applications
Intercom - customer support and feedback management
Asana - task and project coordination
Square & PayPal - payment processing integration
Plaid - financial data access
You can find the complete list of available official and community MCP servers at Composio Dev and MCP Servers.
Want to dive deeper into MCP? I covered Anthropic's Model Context Protocol extensively in: Anthropic Model Context Protocol MCP - The Future of AI Integration
3. Multi-Agent Development (Future Stuff)
This is wild - you can run Claude in multiple terminals and have different instances work on different features of the same project. They coordinate using Git trees.
I haven't tried this yet (Git trees are still confusing for me), but imagine one Claude working on frontend while another handles backend. That's where this is heading.
Handling Mistakes and Reverts by Claude Code (Important!)
One thing I was worried about - what happens if Claude Code messes something up? In Cursor and Windsurf, there's an intuitive "revert" button after every chat that you can click to go back.
Claude Code has several ways to handle this:
Quick Reversion:
Press 'Esc' twice to see your conversation history
Select any previous conversation to revert code to that state
Or simply type in the terminal: "revert to the previous change"
Smart Recovery (This Impressed Me): Here's something that really stood out. Claude Code accidentally deleted some working code while making changes to my project. Instead of panicking and manually fixing it, I simply told it:
"The application was working before and you removed functioning code"
Claude Code immediately:
Checked what it had changed
Identified the deleted working code
Restored the functionality it had removed
This was much better than other AI tools where deleted code often meant manually reverting or rewriting. Claude Code's ability to understand and fix its own mistakes is genuinely impressive.
Limitations and Challenges
Terminal-only interface requires adjustment
Git trees and complex workflows have steep learning curves
Pro plan ($20) restricts you to Sonnet 4 only
Opus 4 access requires expensive Max plans ($100-200/month)
Rate limits can be restrictive for heavy development work
Simple changes might be faster in GUI tools
Who Should Try Claude Code
Perfect for:
Developers working on complex projects
People comfortable with basic development who want to level up
Teams needing consistent workflows
Wait if you're:
Just starting to learn coding
Mainly doing visual/UI work
Not ready for terminal interfaces
New to AI coding tools? Start with my beginner-friendly guide: Cursor IDE: Reduce Your Development Time before diving into terminal-based tools like Claude Code.
My Bottom Line
Claude Code isn't just another AI coding tool. It's a different way of thinking about development - you describe what you want, and it handles the details.
The terminal learning curve is real but manageable. If someone like me (no formal coding background) can get comfortable with it, most people can.
For complex projects, Claude Code delivers results that other tools can't match.
Is it worth $20/month? For me, yes. The time savings and problem-solving capabilities justify the cost.
Should you try it? If you're working on anything complex and willing to learn terminal basics, absolutely. Start small, build comfort, then explore the advanced features.
The future of coding is less about writing code and more about describing what you want. Claude Code is the closest we've gotten to that future.
Step-by-Step Setup Guide for Claude Code
Step 1: Install Claude Code
You need to have “node” installed in your computer, if you haven’t install it.
Go to the terminal and enter the command below
npm install -g @anthropic-ai/claude-codeStep 2: Platform Compatibility (Important!)
Windows users: Claude Code needs a Unix-like environment. You'll need WSL (Windows Subsystem for Linux). I tried on Windows first and I couldn’t make it work. Switched to Mac and it worked perfectly.
Mac/Linux users: Installation is smooth, no issues.
Step 3: Authentication
To run Claude in the terminal just enter
claudeIf you are logging in for the first time, you need to authenticate
Claude Code authentication options:
Anthropic Console: Connect via OAuth with active billing at console.anthropic.com.
Claude App: Use Pro or Max plan for a unified subscription. Log in with your Claude.ai account and select your subscription type.
Enterprise: Configure to use Amazon Bedrock or Google Vertex AI with your existing cloud infrastructure.
Step 4: Initialize Your Project
Navigate to any project directory (new or existing):
cd your-project-directoryAnd then enter
claudethen
/initThis creates a claude.md file that analyses your codebase and sets up guidelines for Claude. Think of it like cursor rules.
Once done, you are ready to start coding.
Step 5: Start Coding
Just start describing what you want in natural language, your idea or the feature or the concept, and Claude Code will start the magic. No complex prompts needed. However, the better the quality better the output.
Step 6 : Configuring your IDE
Claude Code currently supports two major IDE families:
Visual Studio Code (including popular forks like Cursor and Windsurf)
JetBrains IDEs (including PyCharm, WebStorm, IntelliJ, and GoLand)
Steps to configure Cursor,VS Code or Windsurf:
Open VSCode
Open the integrated terminal
Run
claude- the extension will auto-install
Want to try Claude Code? Check out Anthropic's docs for setup. Start with a simple project to get comfortable.